
Automation 2.0
Automations
Automations 2.0 allows you to configure workflows that trigger based on campaign events, or website events, or both. It provides:
-
A modern UI for building automations more quickly
-
Support for using both email campaign events, such as opens, clicks, and sent, and website events, such as view product, add to cart, purchase, and remove from cart.
-
Able to filter, delay, and perform actions such as send email, update contact, based on event and subscriber data.
-
Easier management of all your automations from a central dashboard
1.1 Prerequisites & Feature Enablement
To use this feature,
-
It must be enabled for your realm. Reach out to your account manager to get this feature enabled.
-
Event tracking should be enabled on your website to start trigger emails based on website events.
-
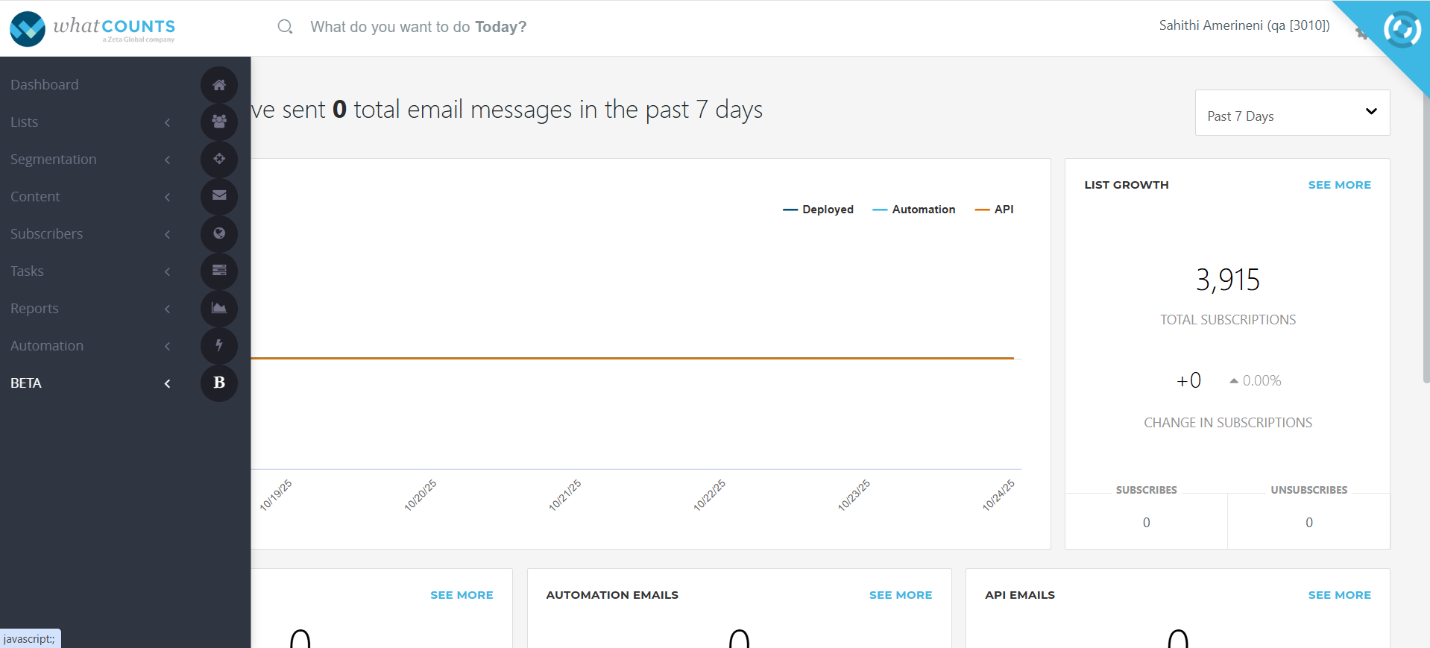
When this feature is enabled, you will be able to view this module, as shown in the screenshot below.
-
Click on BETA module to view Automations 2.0 module, in which you can see Automations, Reports and Product Layout sub-modules.
1.2 Create a New Automation
-
Click on Automations to navigate to the dashboard, where you’ll find the “Create Automations” option located at the top right corner.
-
Click on “Create Automation” to set up a new automation.
Note: You can create only one automation per trigger event.
-
Once you click on “Create Automation,” the following pop-up window will appear.
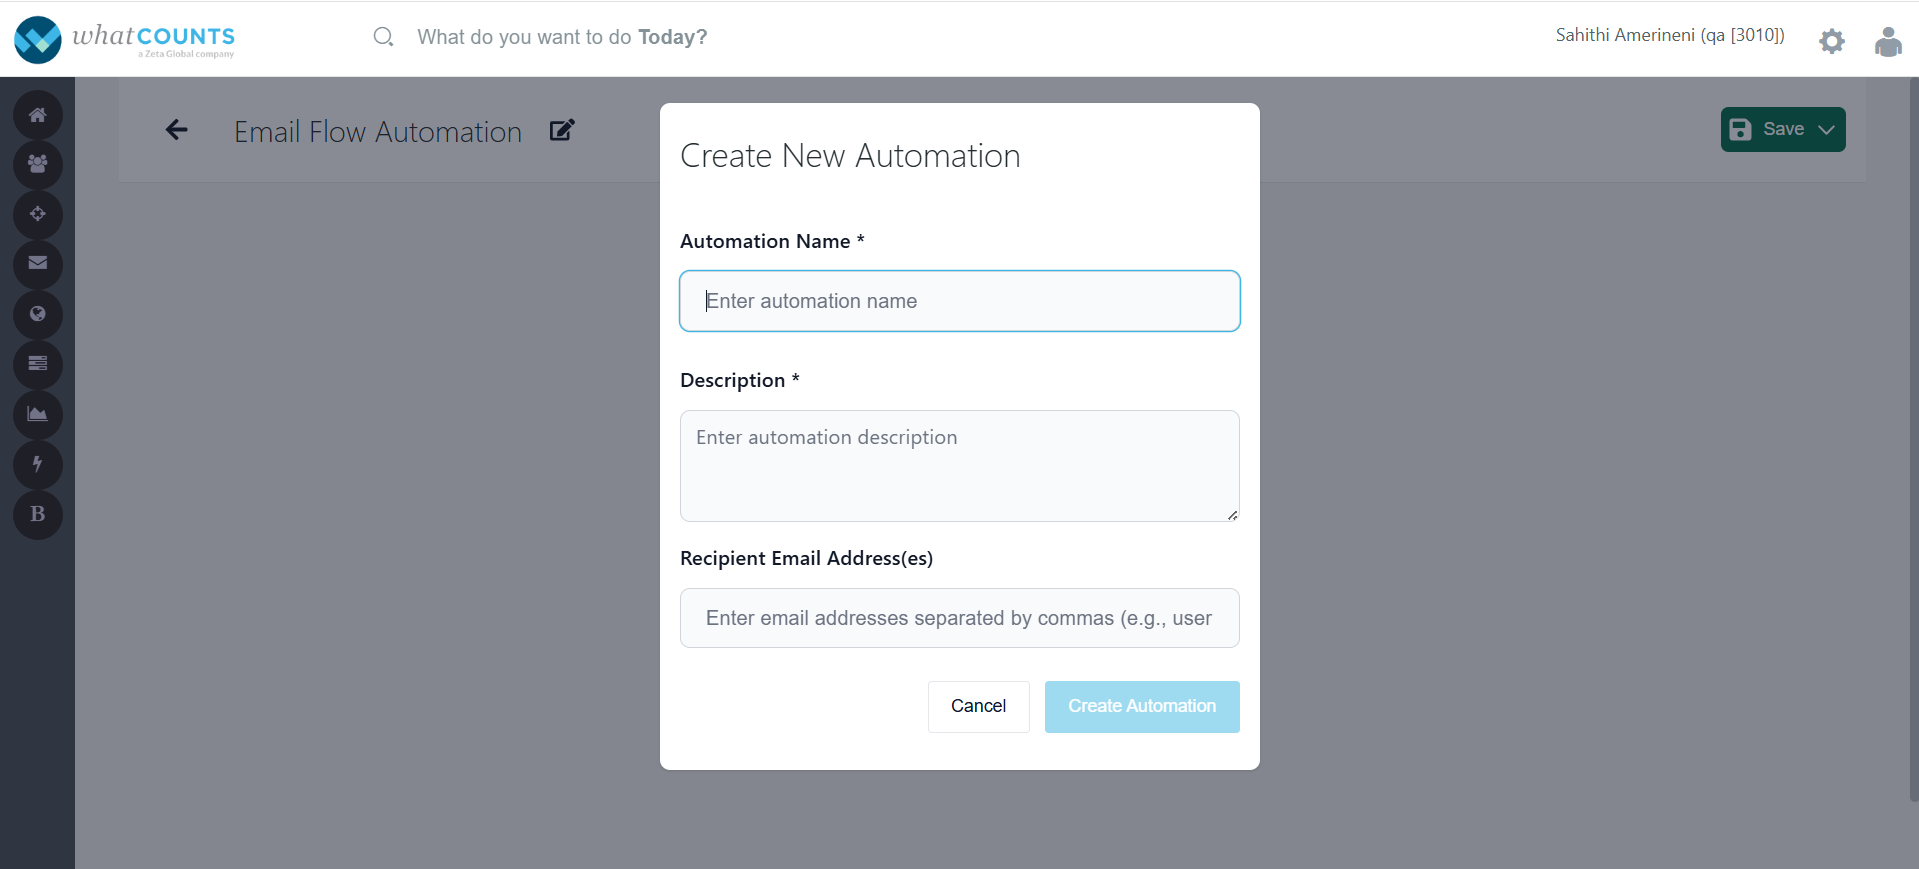
-
Fill in the required details:
-
Automation Name – A mandatory field where you can enter a unique name for your automation.
-
Description – A mandatory field to briefly describe the purpose or functionality of your automation.
-
Recipient Email Address(s) – Enter one or more email addresses (separated by comma) to which notifications related to this automation should be received, i.e., whenever this automation is activated or de-activated, an alert will be sent to those email addresses.
-
Click on Create Automation to proceed.
-
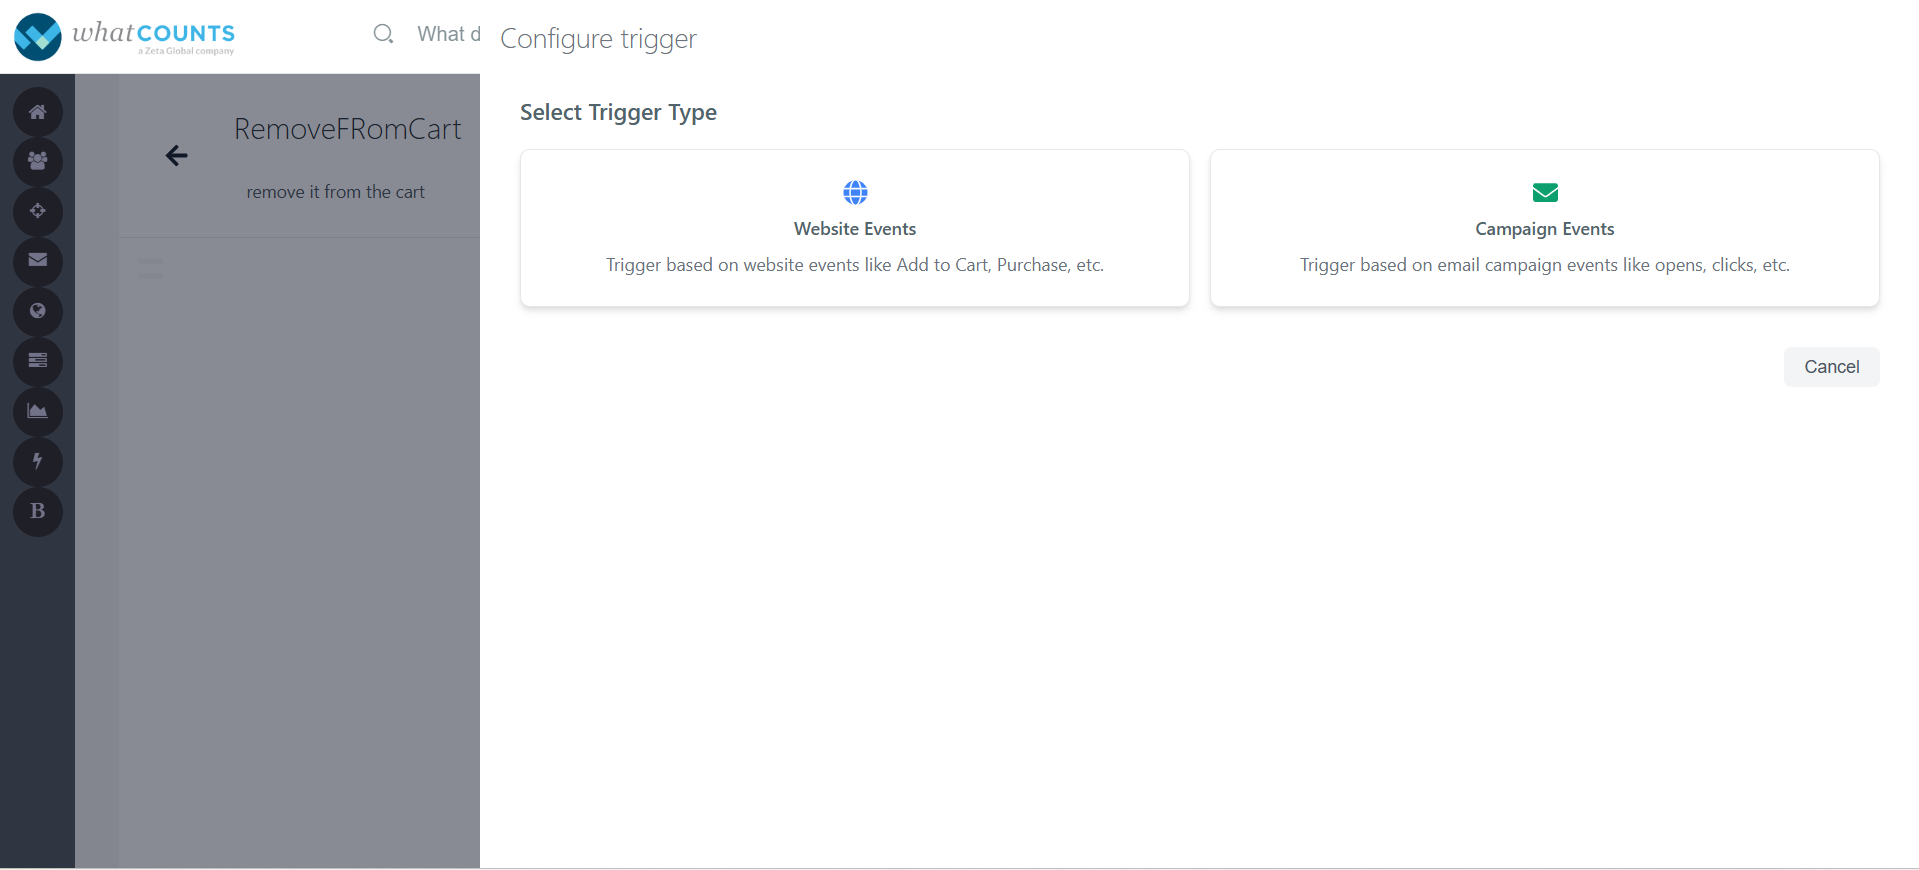
If both website and campaigns events are enabled for your realm, you can configure trigger based on website events or campaigns events as shown in below snippet.
-
-
-
-
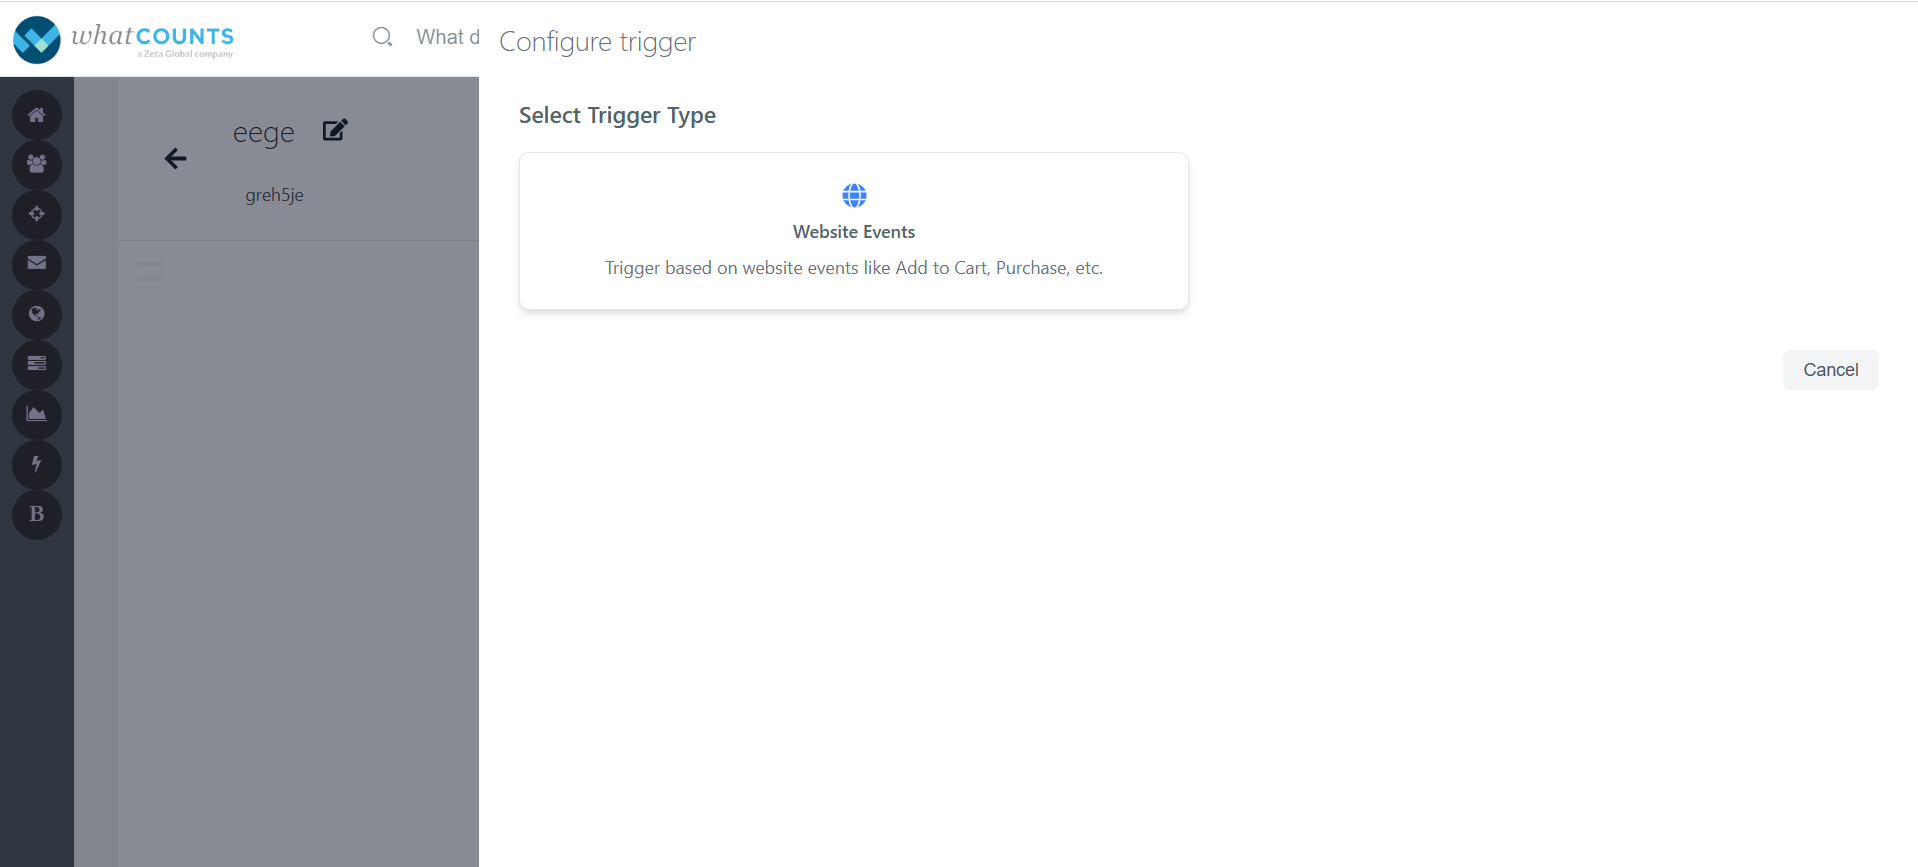
If only website events are enabled for your realm, you can configure trigger based on website events as shown in below snippet.
-
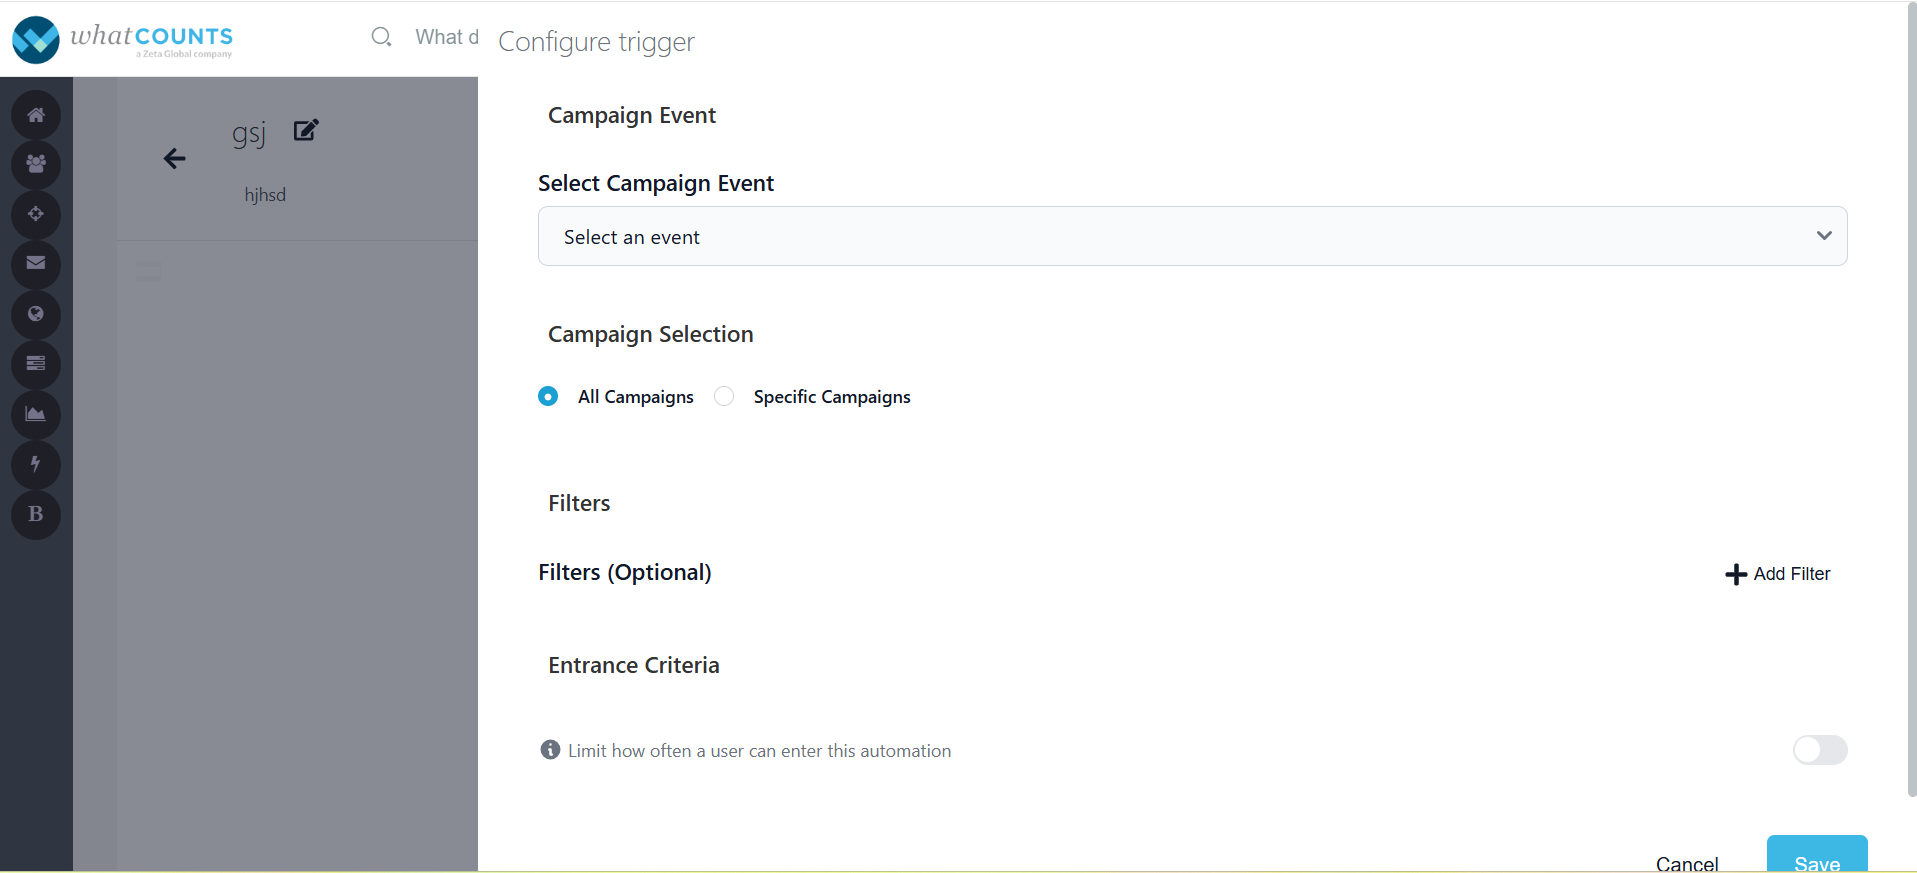
If only campaign events are enabled for your, you can configure trigger based on campaign events as shown in below snippet.
-
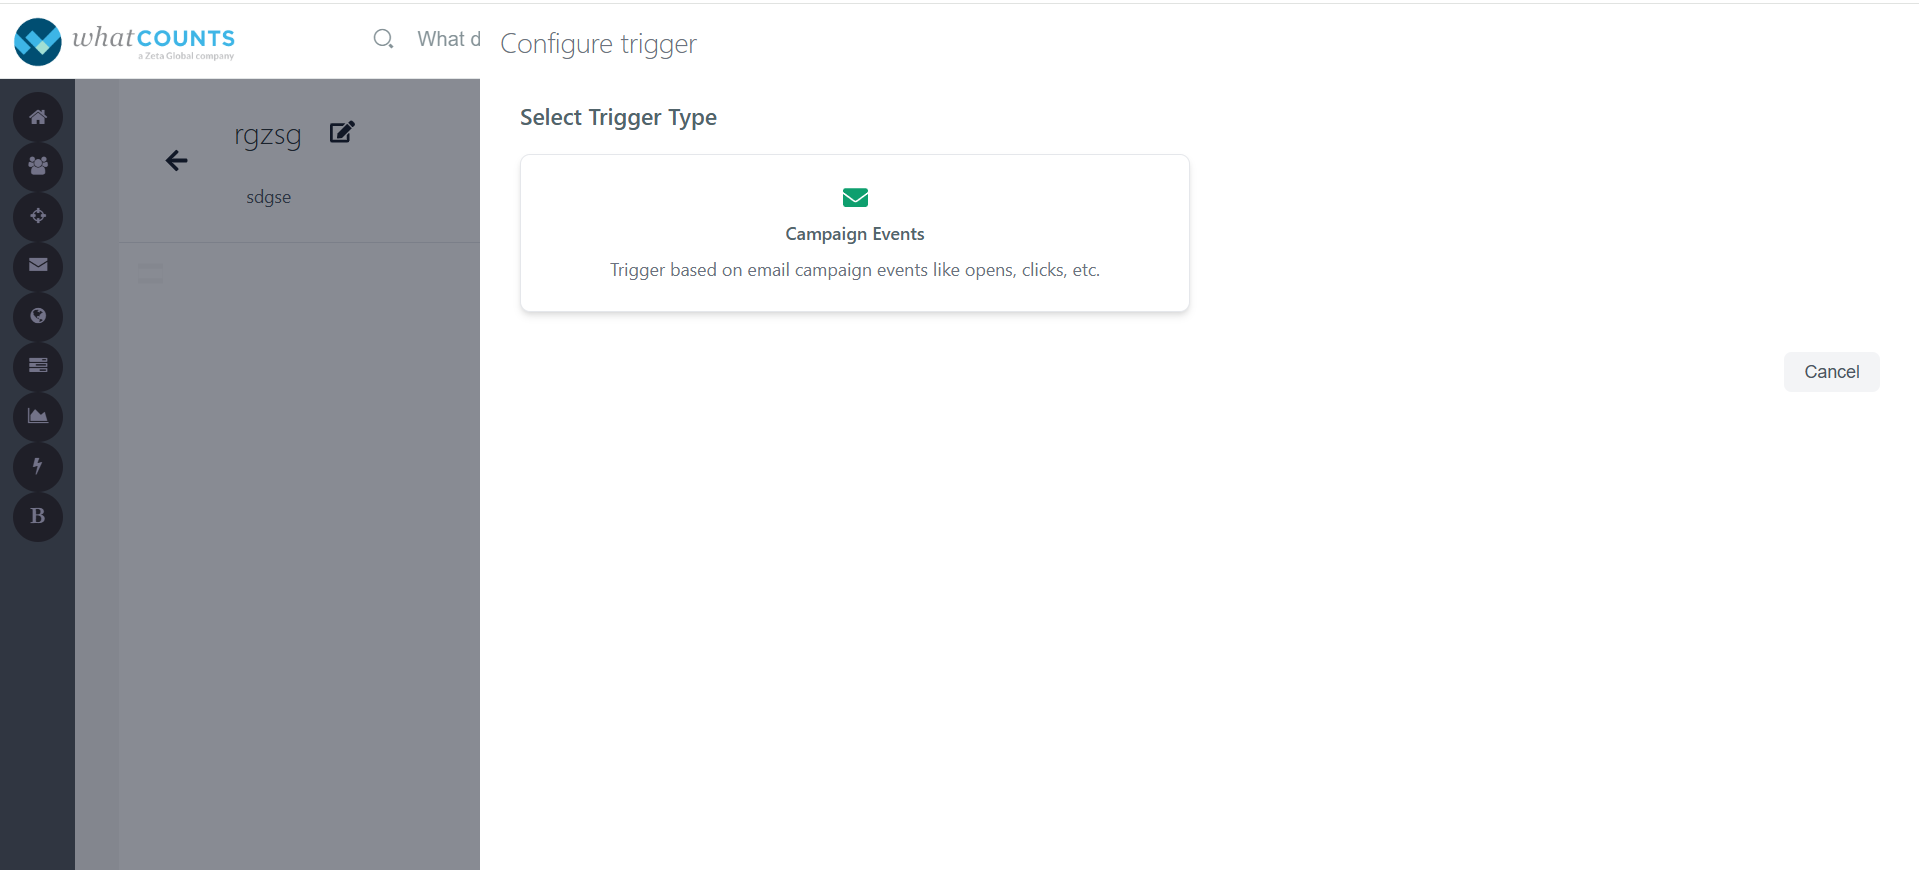
Select Trigger Type
-
You’ll be presented with two trigger types:
-
Website Events
-
Campaign Events.
-
-
-
Website Events
-
Select this to set automation on the customer activities performed on your website — for example:
-
Add to Cart – Occurs when a customer adds a product to their shopping cart. This event helps identify purchase intent and can be used to trigger reminders or personalized recommendations if the purchase is not completed.
-
Purchase – Occurs when a customer completes a transaction on your website. It helps to trigger post-purchase actions such as confirmation emails.
-
Product View – Triggers an email when a customer views a product page.
-
Email Sign-up – Occurs when a customer subscribes to your newsletter or promotional emails. It allows you to build your contact list and initiate welcome or engagement campaigns.
-
Remove from cart – Occurs when a user subscribes to your newsletter or promotional emails. It allows you to initiate welcome or engagement campaigns.
-
-
This is ideal for automation that depends on customer behavior within your website.
-
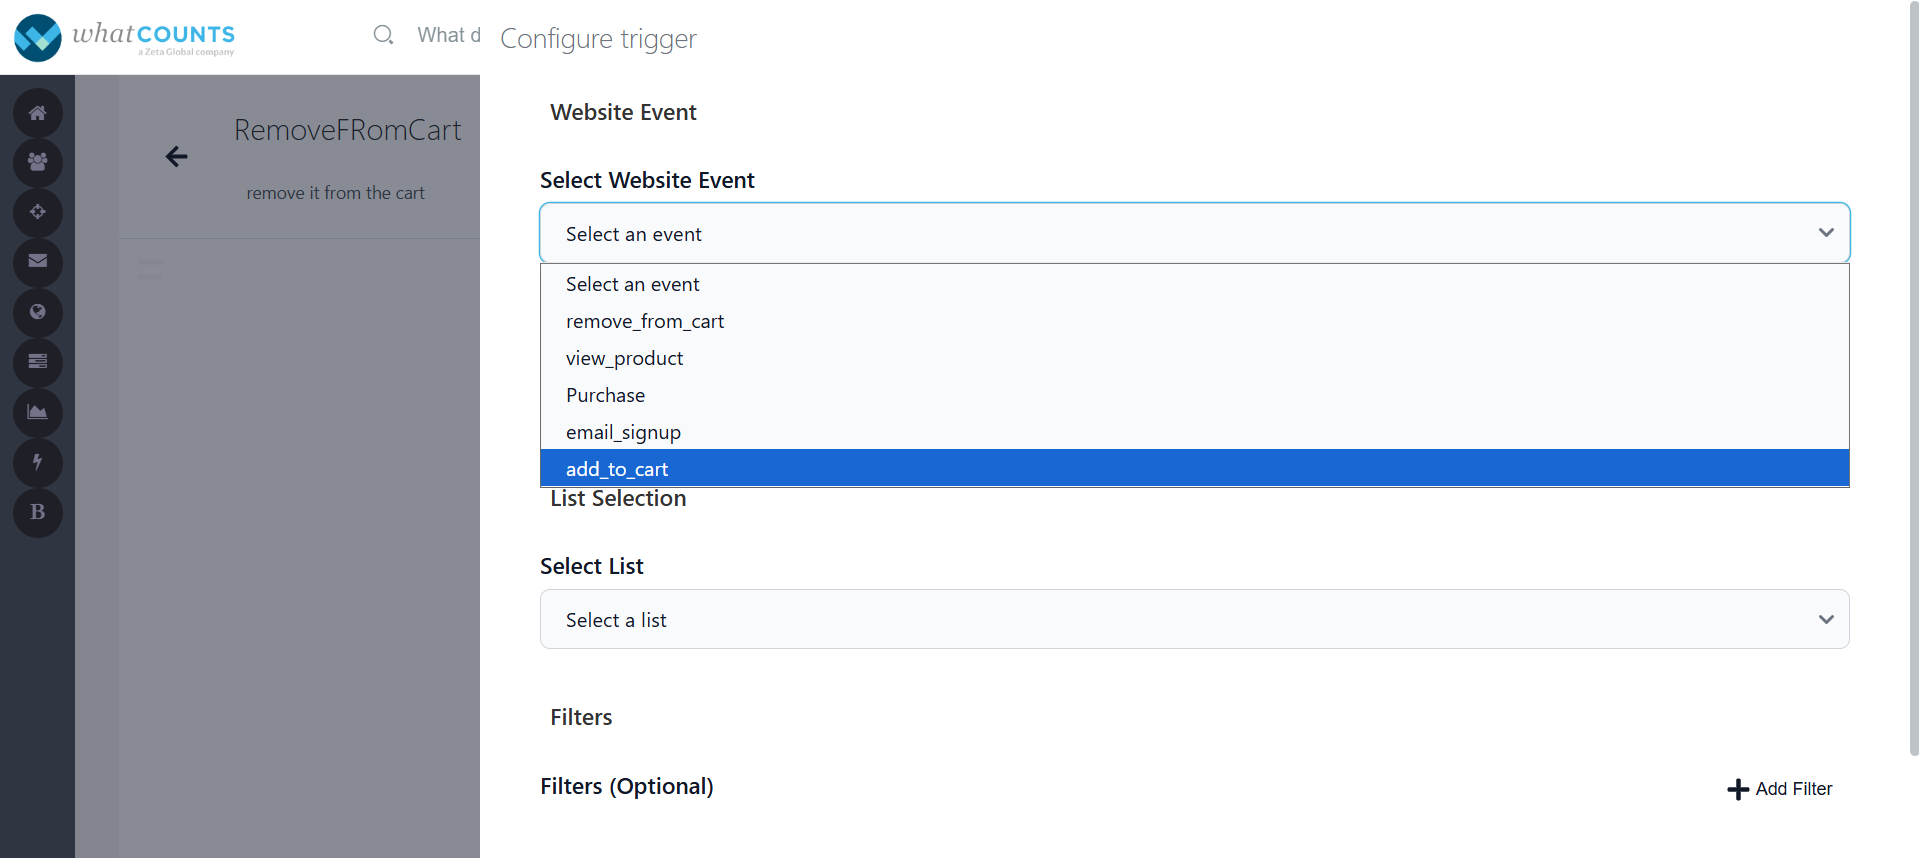
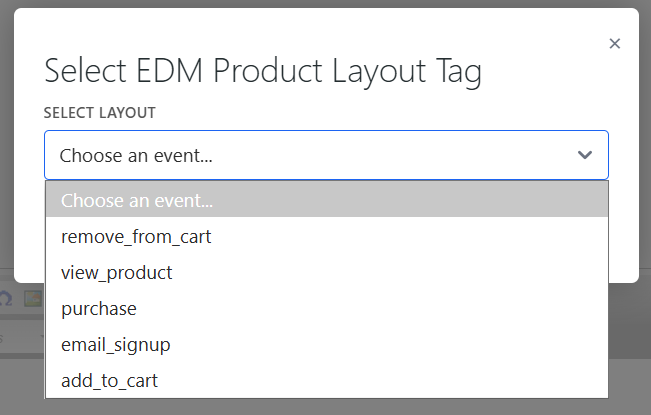
Select Website Event Trigger:
-
After selecting event type as a website, a list of available website events that are configured for your realm management will appear here.
-
-
Select one event as the trigger for your automation.
-
Entrance Criteria will allow you to limit how often a customer can enter your automation. There are mainly 2 types:
-
Lifetime limit: Set a total number of times a customer can enter your automation.
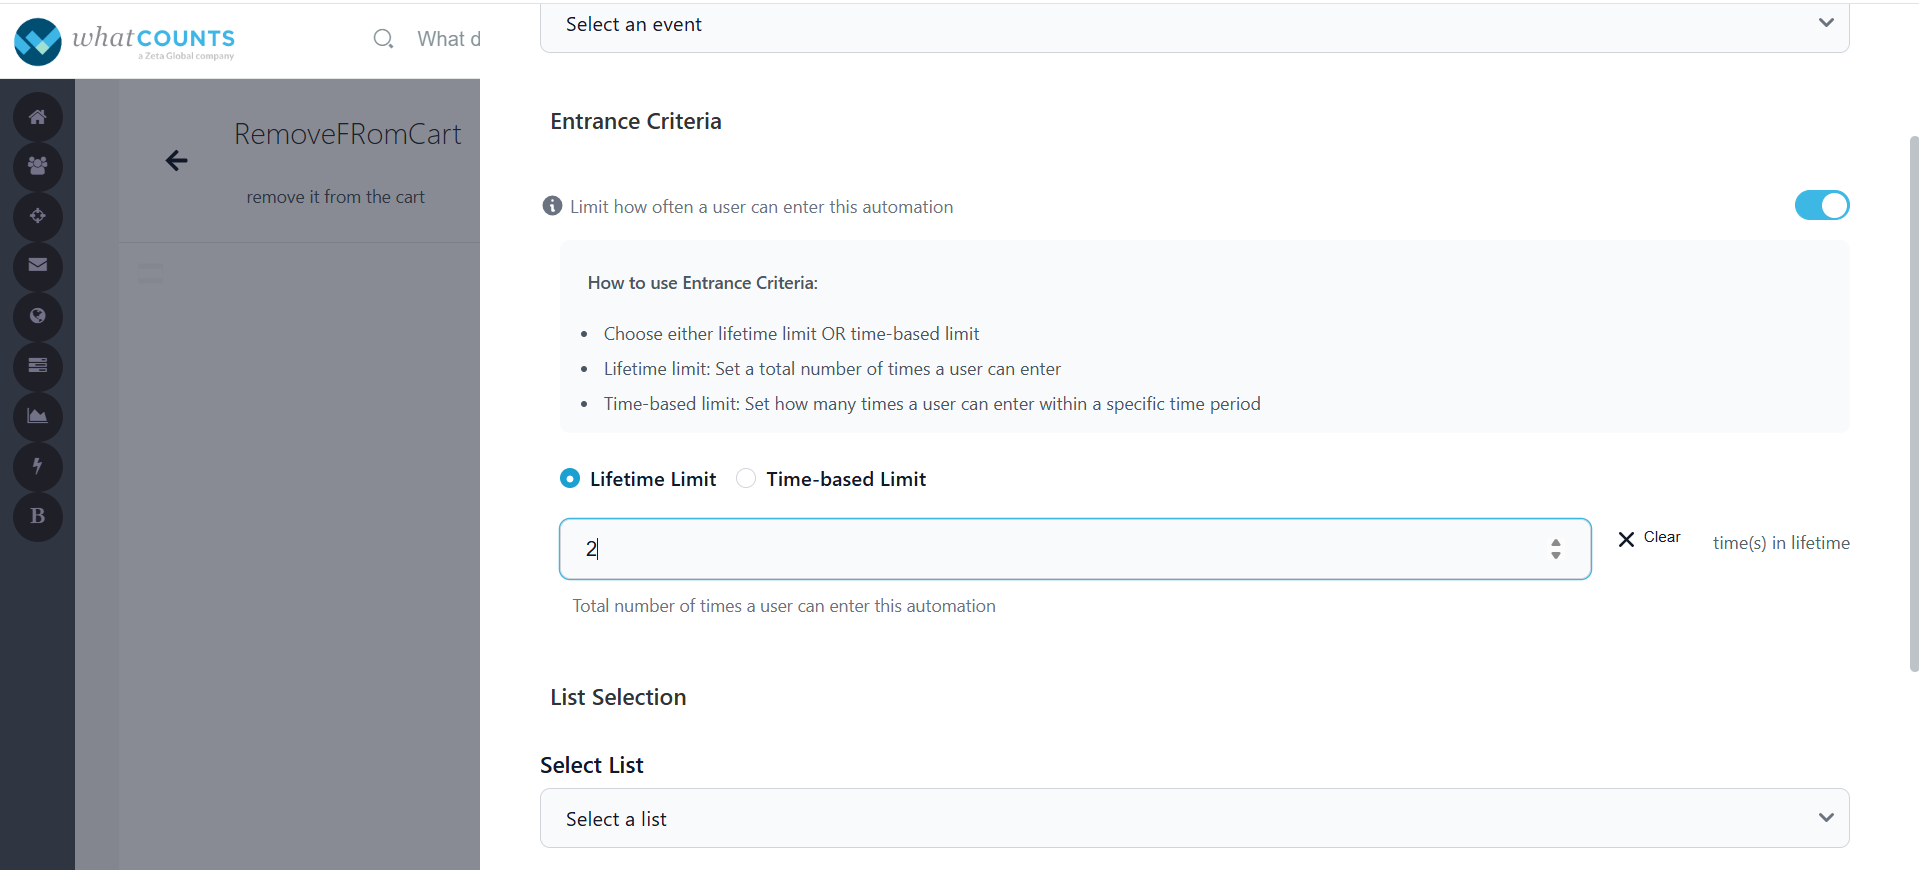
For example: Suppose you have an automation that sends a Product Recommendation” email whenever a customer views a product.-
If you set the lifetime limit to 1, the customer will receive the recommendation email only the first time they view that product, even if they view it for multiple times later.
-
If you set the limit to 3, the customer could receive the recommendation email up to three times for that event over their lifetime.
-
-
Time-based limit: Set how many times a user can enter within a specific time period [within a day(s), week(s), month(s)].
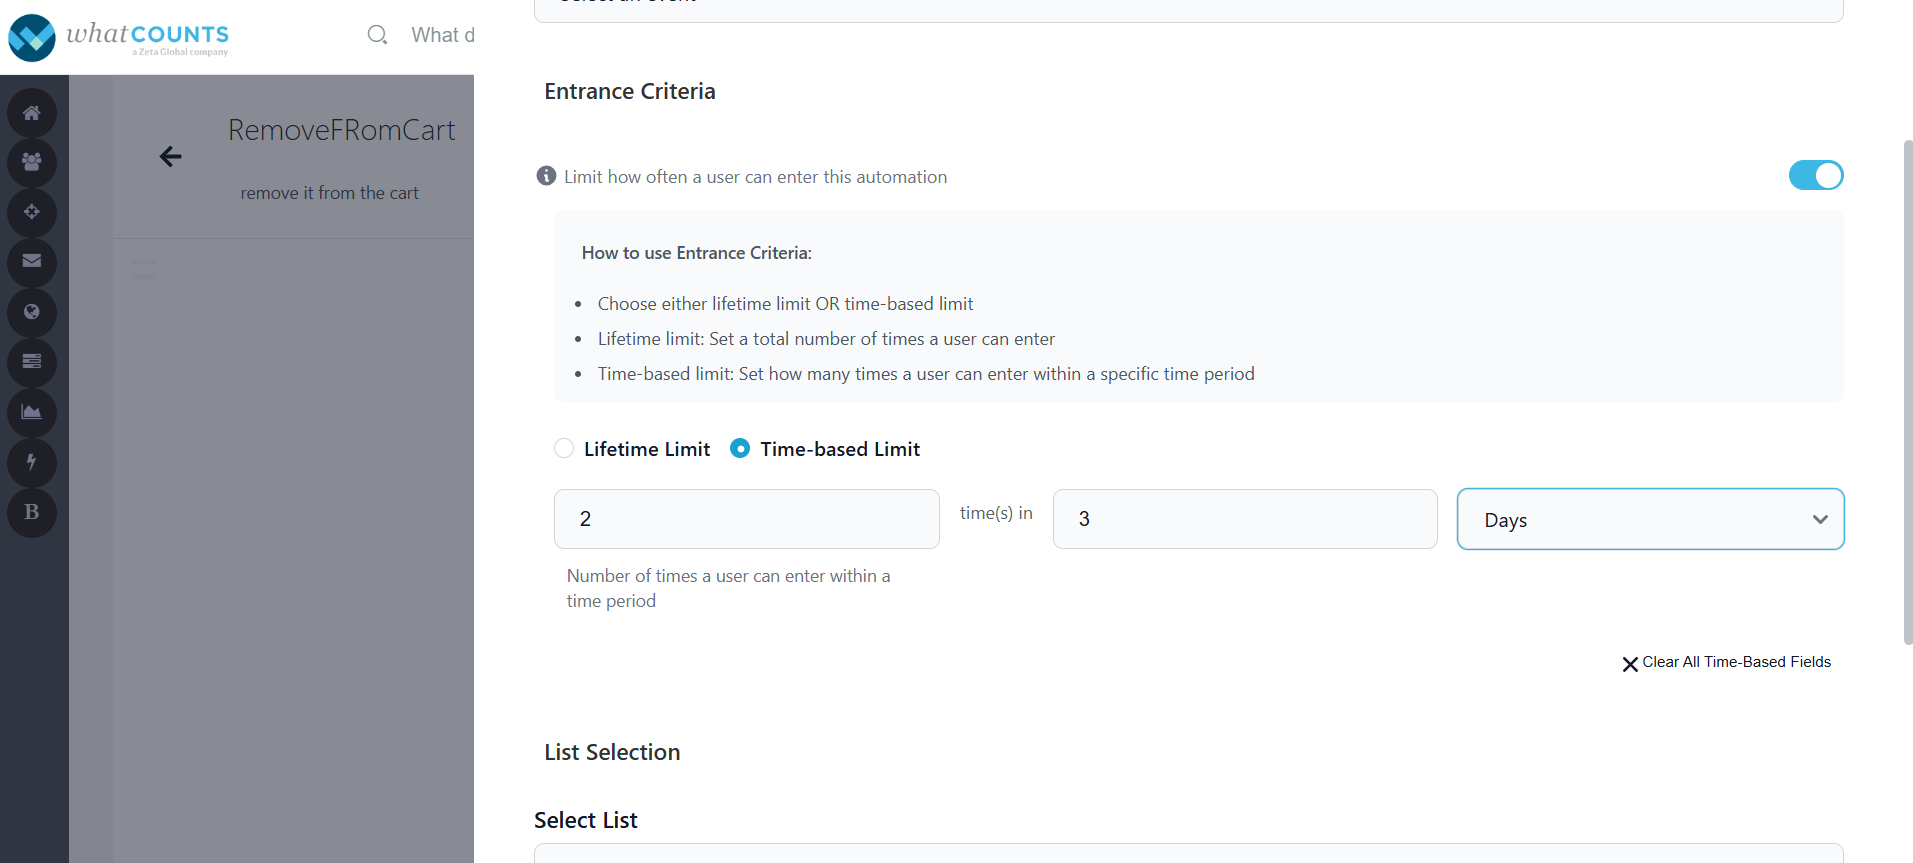
For example: Suppose you have an automation that sends a “Viewed Product Reminder” email whenever a user views a product.-
Limit: 2 per 7 days
-
Scenario: If a customer views the product multiple times in a week, they will only receive two reminder emails within those 7-day period. After 7 days, if they view the product again, the automation can trigger another email.
-
-
-
List Selection:
-
Select List: This dropdown will display all the lists which are created in the list module, where you can select a list for which your automation should be triggered based on their actions.
-
-
Filters (Optional):
-
Filters let you narrow down who enters the automation:
-
You can filter based on subscriber property, or custom fields.
-
-
Filters use three components:
• Field — the data attribute (e.g. productName, state, optInStatus)
• Operator — equals, contains, greater than, etc.
• Value — the target value to compare against -
You may add multiple filters; if there are multiple, all the filters must be true (logical AND).
-
-
Campaign Events
-
Choose this option if you want to trigger the automation based on email campaign activities such as:
-
Email Opened
-
Email Clicked
-
Email Sent
-
-
This is useful when your automation depends on how recipients engage with your email campaigns.
-
Select Campaign Event Trigger Type:
-
After selecting event type as campaign, a list of available campaign events will be appeared here.
-
You can select all the campaigns or specific campaigns for which your automation to be triggered.
-
Filter allows you to filter based on subscriber properties or custom fields.
-
Entrance Criteria will allow you to limit how often a user can enter your automation.
-
-
-
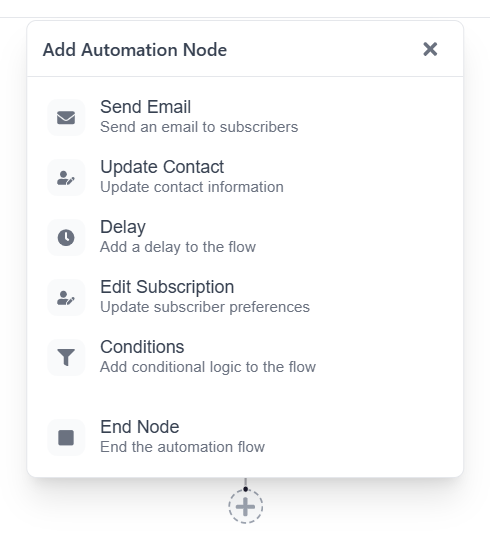
Add Steps / Nodes:
-
Once the trigger is set, you build your workflow with nodes as shown below.
-
-
Node Types:
-
Perform operations like:
-
Send Email
-
Update Contact
-
Delay
-
Edit Subscription
-
Conditions
-
-
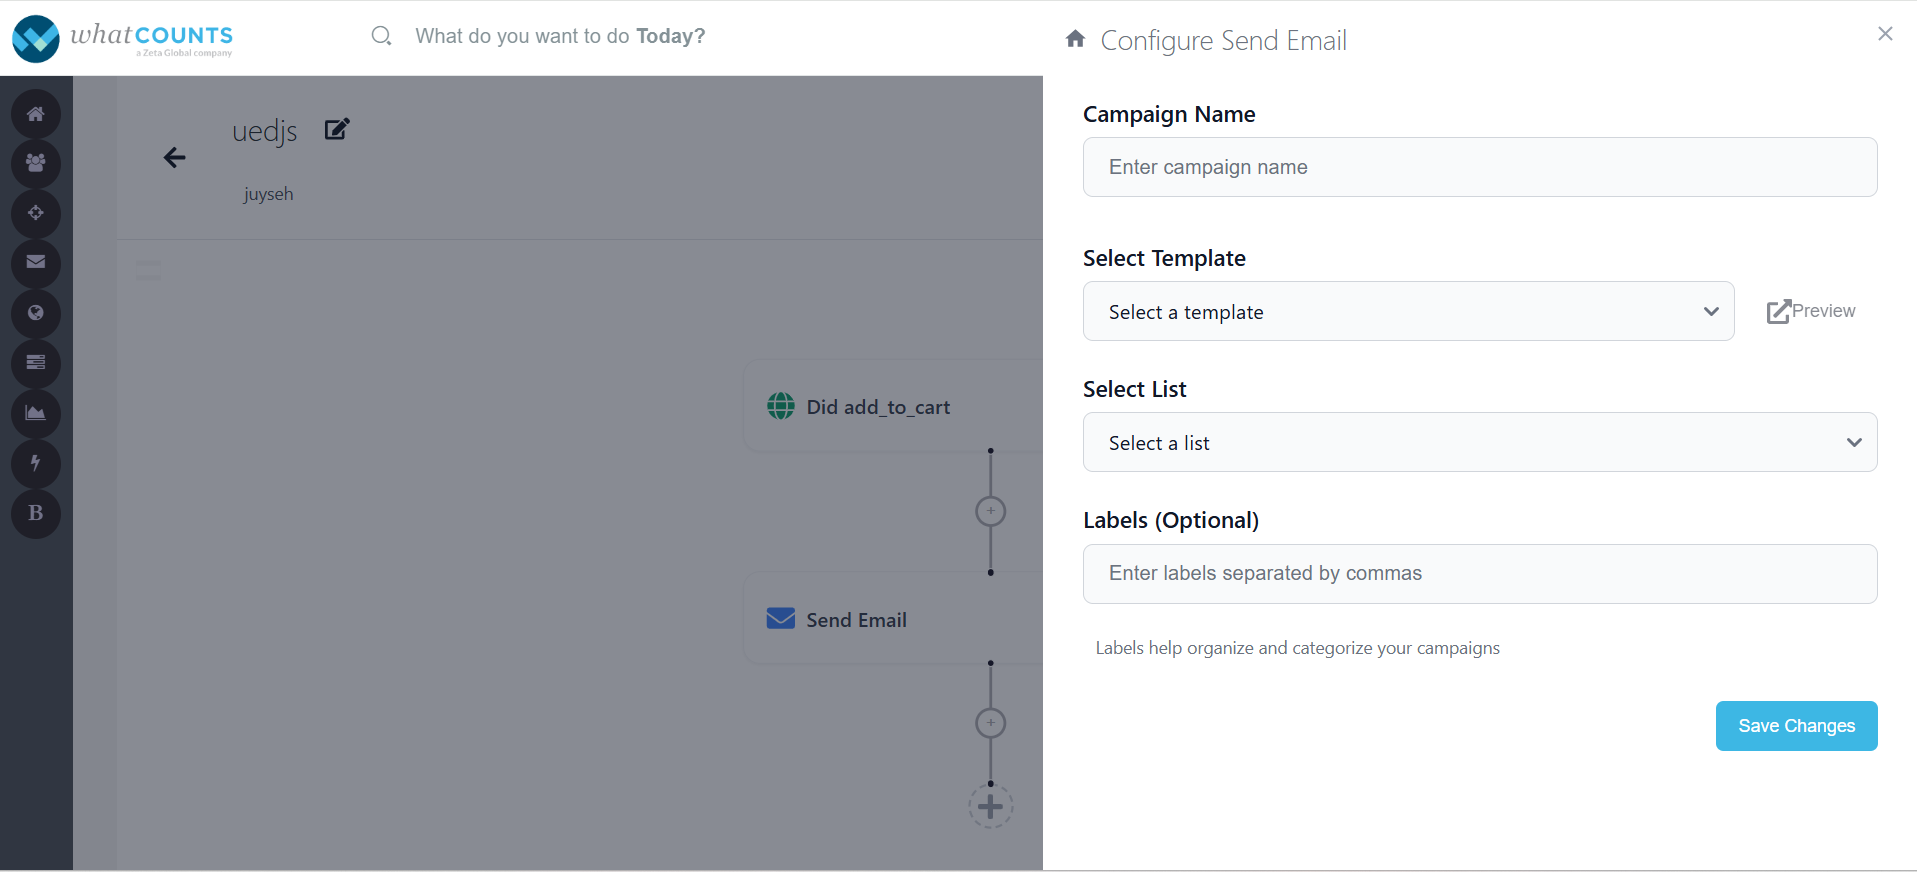
Send Email – This node allows you to send email once the trigger is set.
-
-
Provide a unique campaign name for which email should be sent.
-
Select a template – the dropdown includes all the templates which were created in Templates. Clicking on Preview, opens the template view in a separate tab.
-
An optional text field that allows you to add one or more labels using a comma separator, to categorize and organize your campaigns.
System ensures the subscriber is opted in before sending an email.
-
Click on Save changes, once you select all the above fields.
-
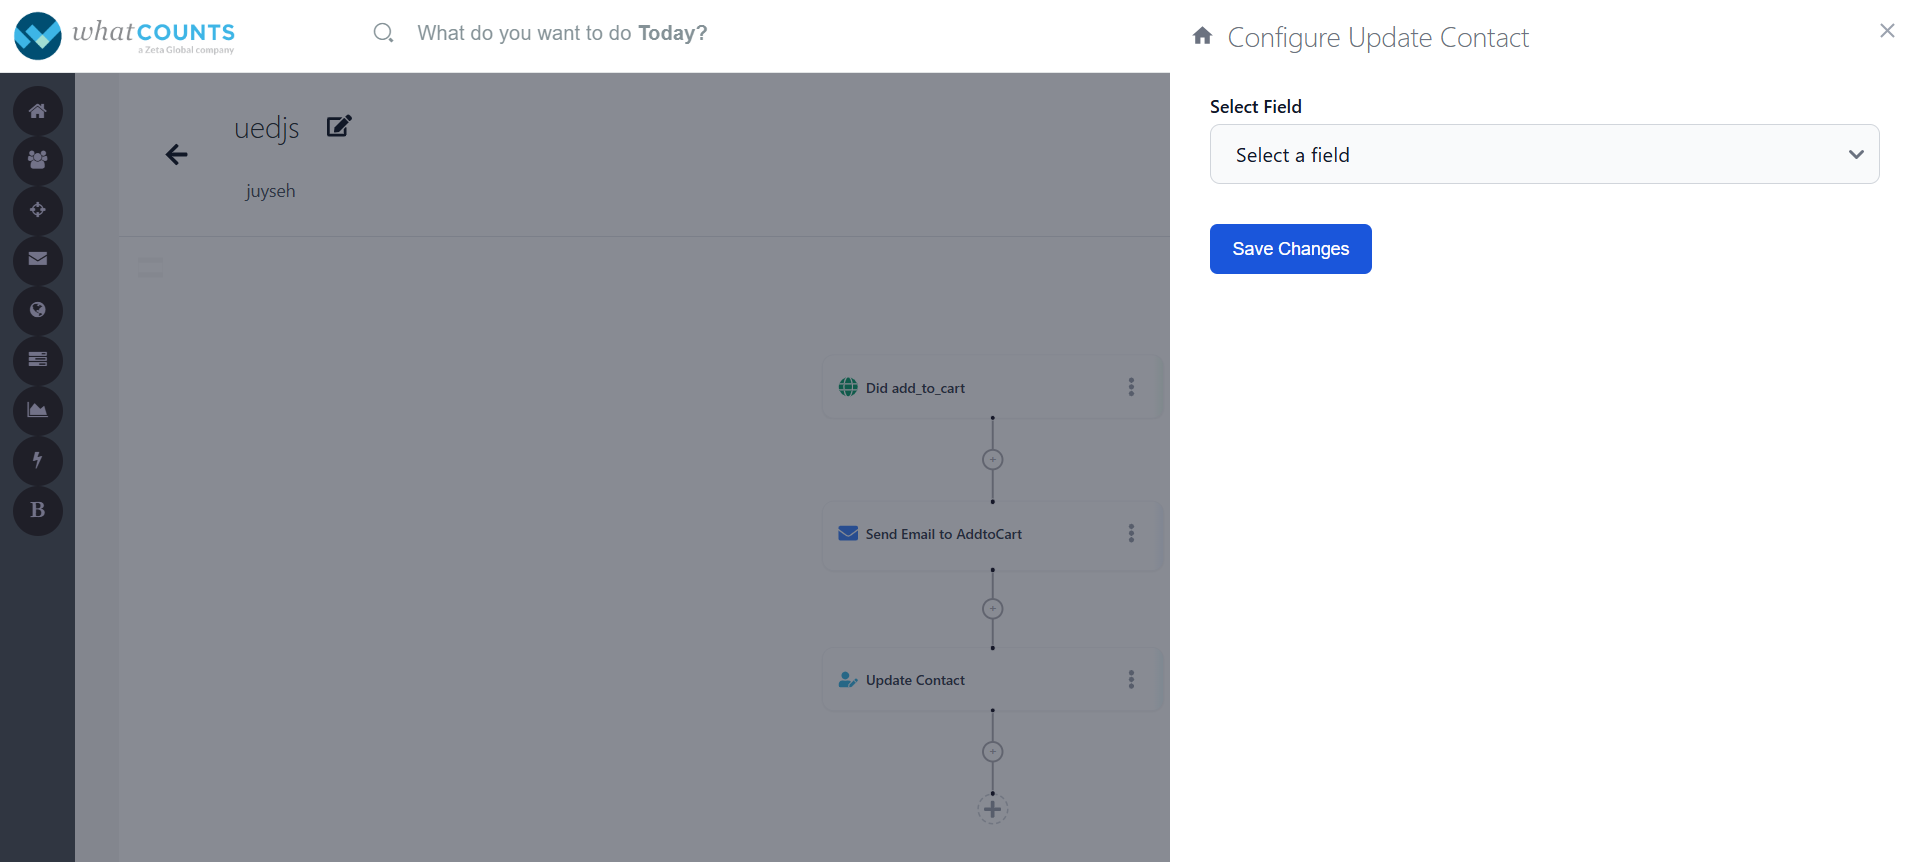
Update Contact – This node allows you to update contact details
-
Choose the subscriber field to update from, “Select Field” dropdown.
-
Provide a static value to set or choose to clear the field.
-
To clear the selected value, click on “Clear Value” and click on Save Changes.
-
-
Delay –This node allows you to wait for a duration and move to the next node.
-
Two options:
-
Wait for duration: define a delay in minutes, hours, or days.
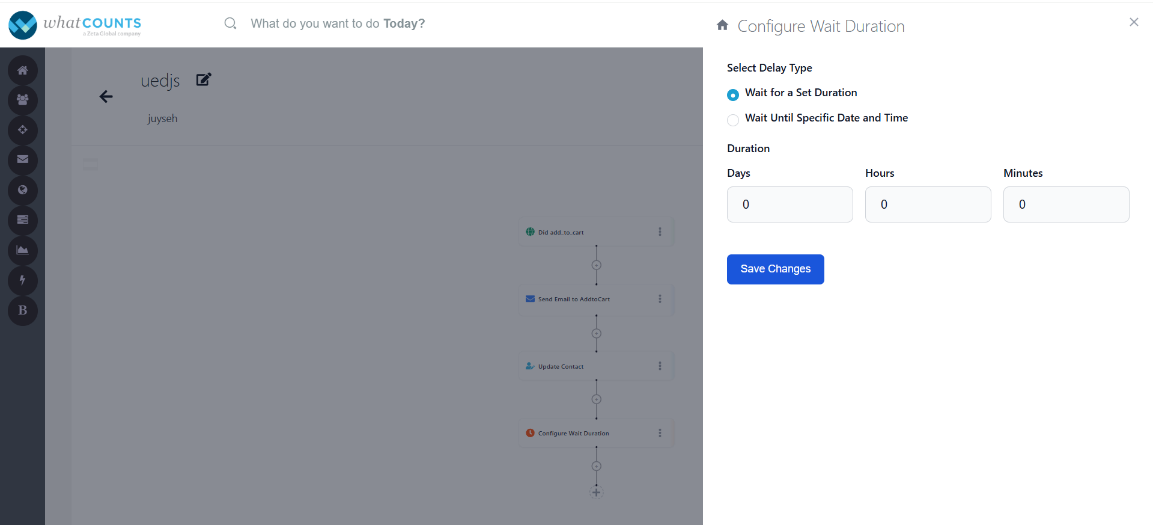
-
Wait until specific date/time
-
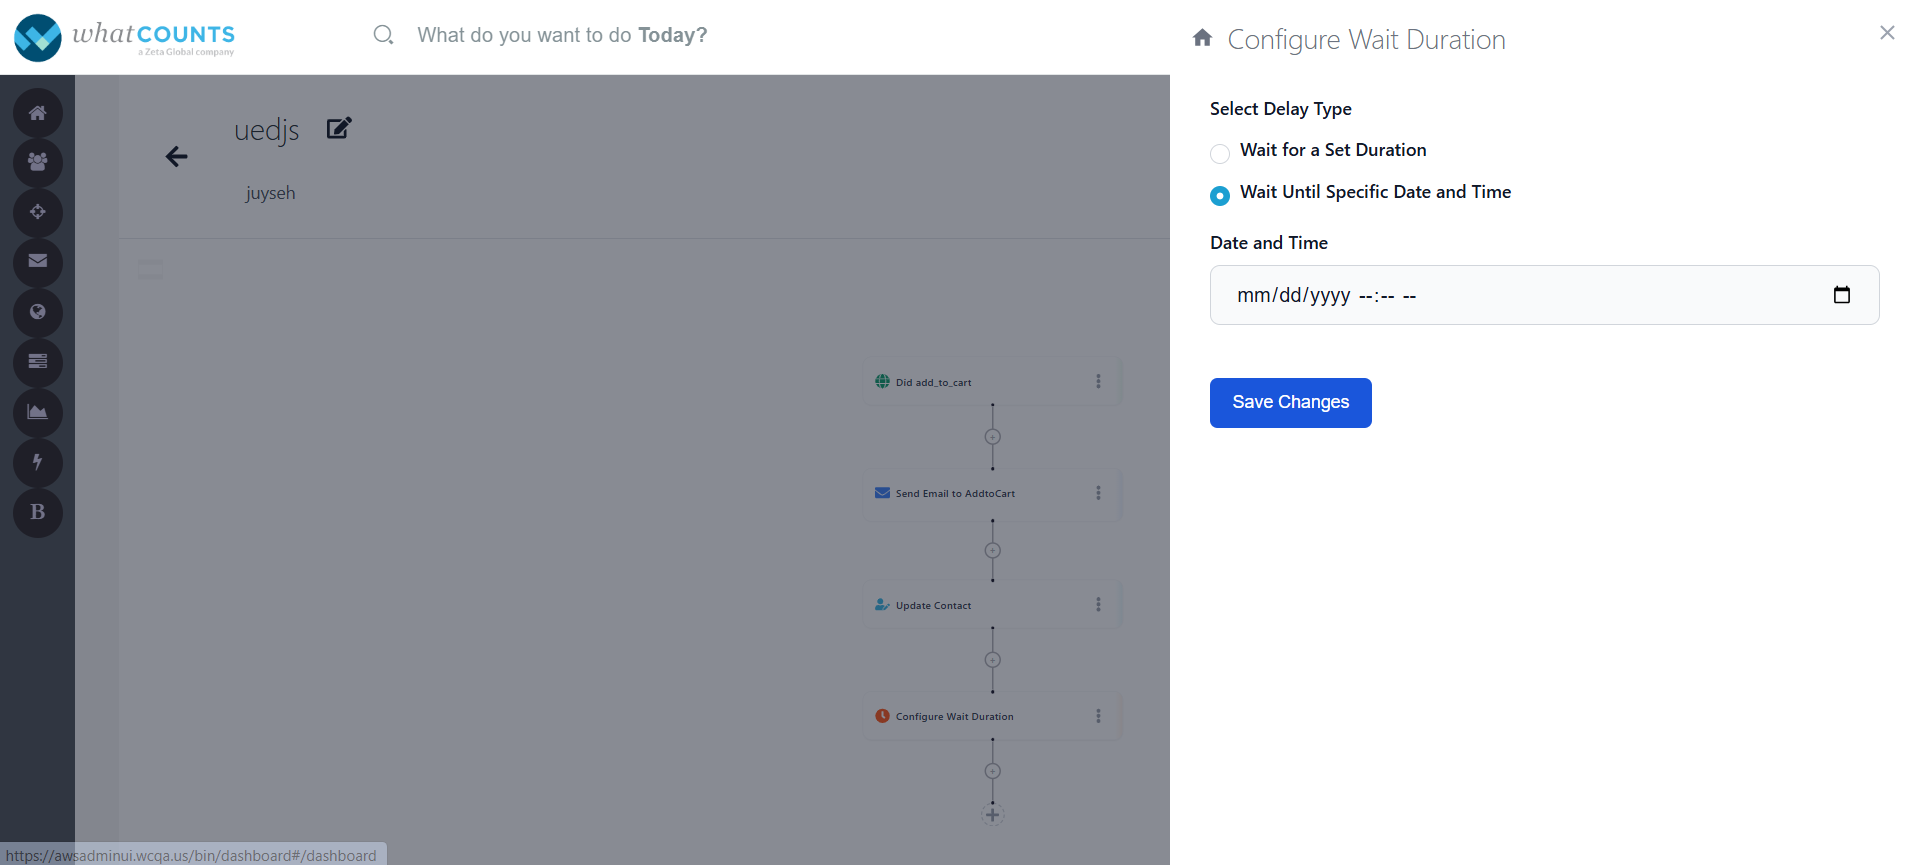
-
Edit Subscription -- It allows you to add Contacts, unsubscribe Contacts from one or more[specific lists] or all lists in a realm.
-
Choose Opt-in / Opt-out and whether it’s from all the specific or all the lists.
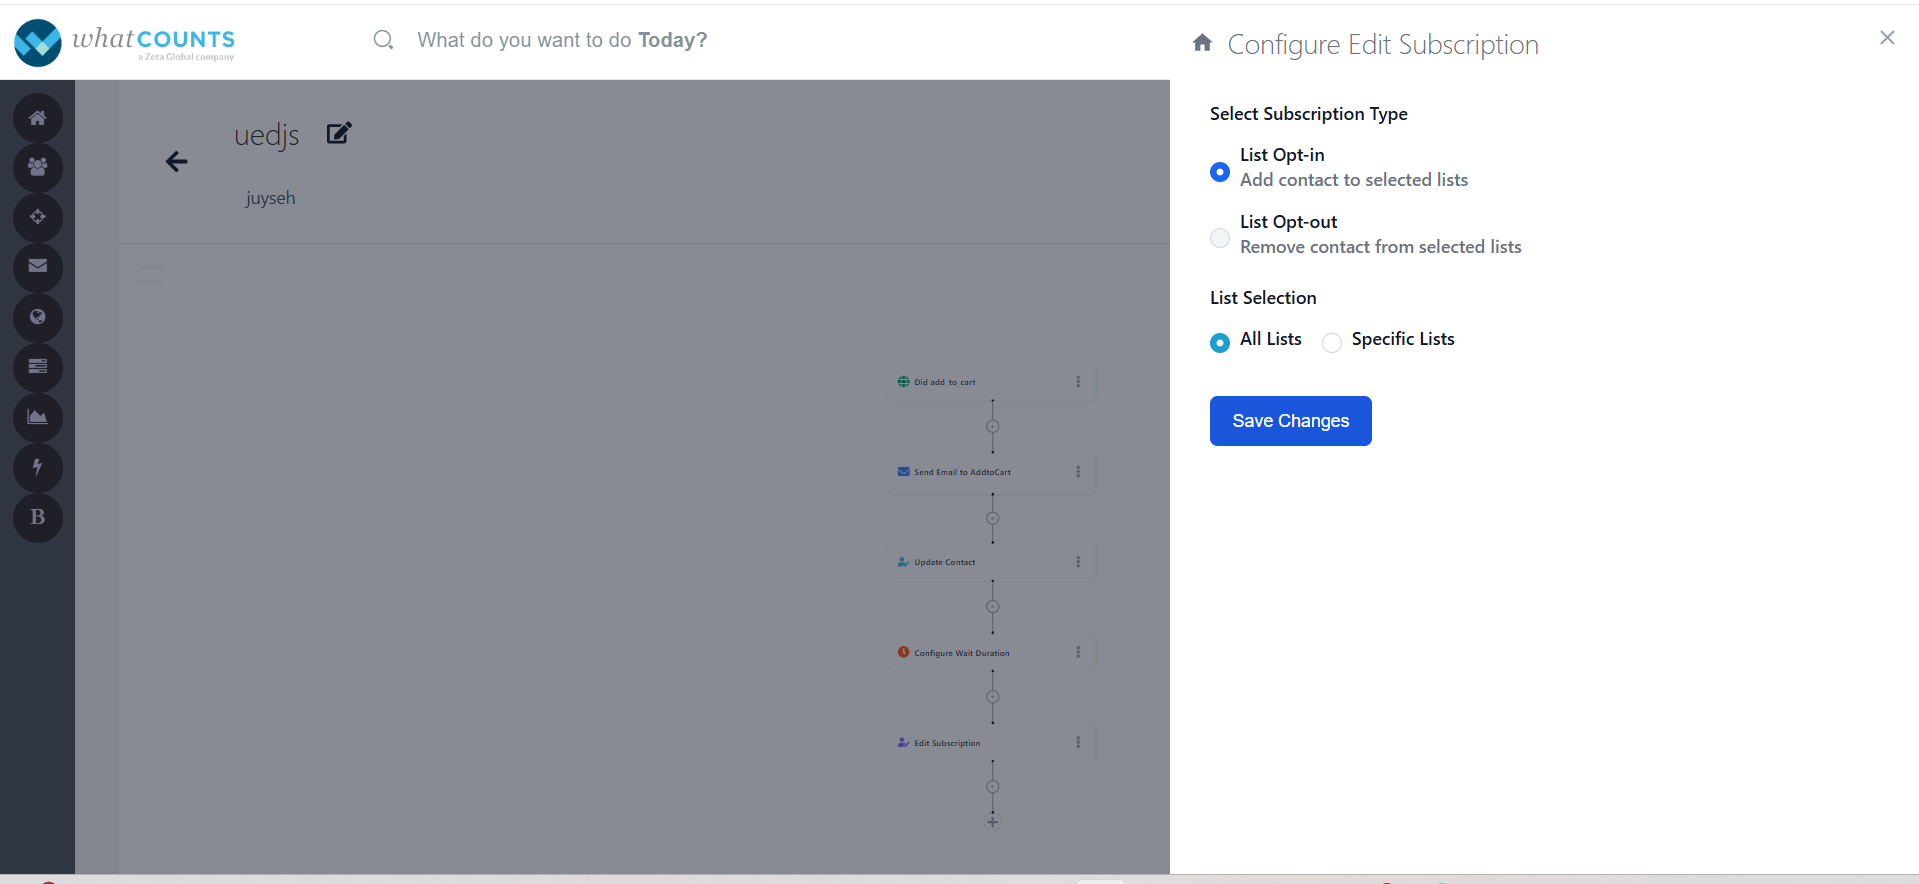
-
If list level, choose which list(s) and save your changes.
-
-
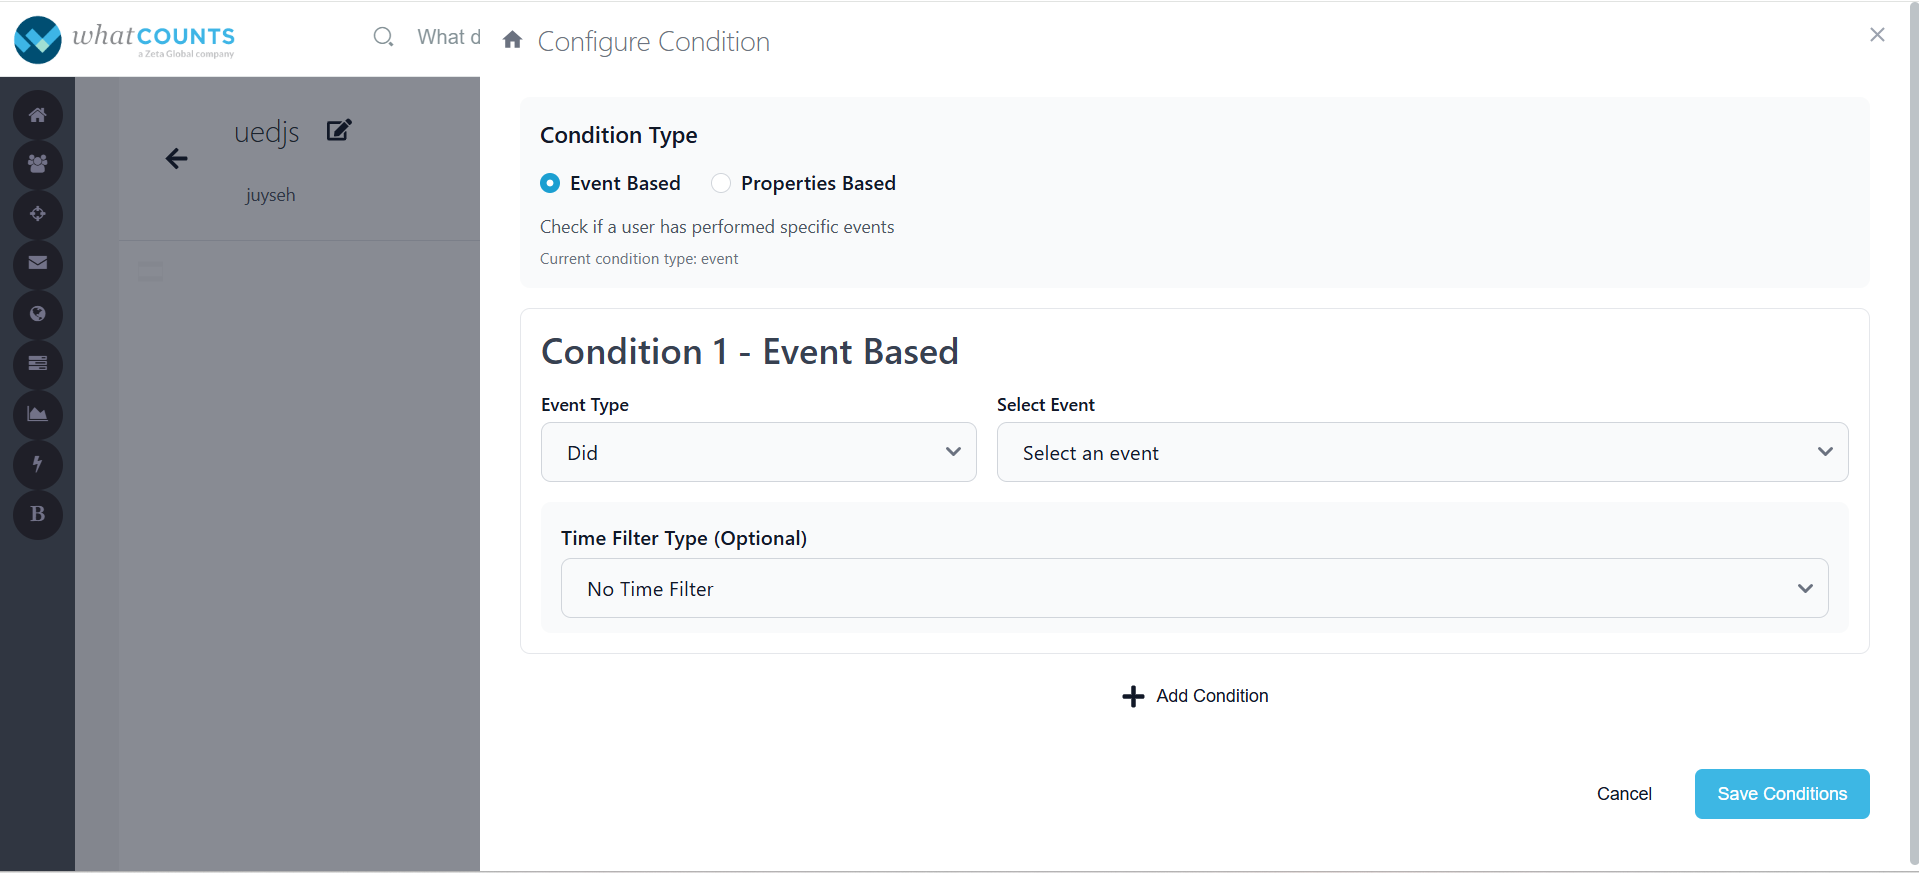
Configuring Condition Node:
-
The Condition Node allows you to define the specific user actions or behaviours that will trigger the next step in your automation flow.
-
-
Choose Condition Type
-
You’ll first need to select the type of condition you want to base your trigger on:
-
Event Based (default selection) – Used when you want to trigger based on a subscriber activity, such as adding an item to the cart, making a purchase, or opening an email.
-
Properties Based – Used when you want to trigger based on subscriber’s profile attributes (for example, fname, lname, location etc).
-
-
Condition 1, you can define what specific event should activate the next action in your automation.
-
Event Type – Select whether the user Did or Did Not perform a specific event.
-
Select Event – Choose the event you want to track from the dropdown.
The available events are grouped into two categories:-
Campaign Events:
-
Email Opened
-
Email Clicked
-
Email Sent
-
-
Website Events:
-
Add to Cart
-
Purchase
-
Browse Page
-
Sign Up
-
-
-
Time Filter Type (Optional) – Use this if you want to restrict the condition to a specific time window (e.g., within the last 7 days). If no time limit is needed, leave it as a No Time Filter.
-
Example: In an automation, if you want to check if customer purchased products in 6 hours from the time of receiving the trigger event before sending an email.
-
Event Type: Website
-
Event: Purchase
-
Filters: Need to set a time specific filter here
-
Field:”Purchasedateandtime”, operator:“< “, value: “6 hours” from “triggereventdateandtime”.
-
-
-
Once the event and conditions are configured, click “Save Conditions” to apply the node and proceed to define the next step in your automation flow.
-
To add more than one condition, click on “+Add Condition” option.
-
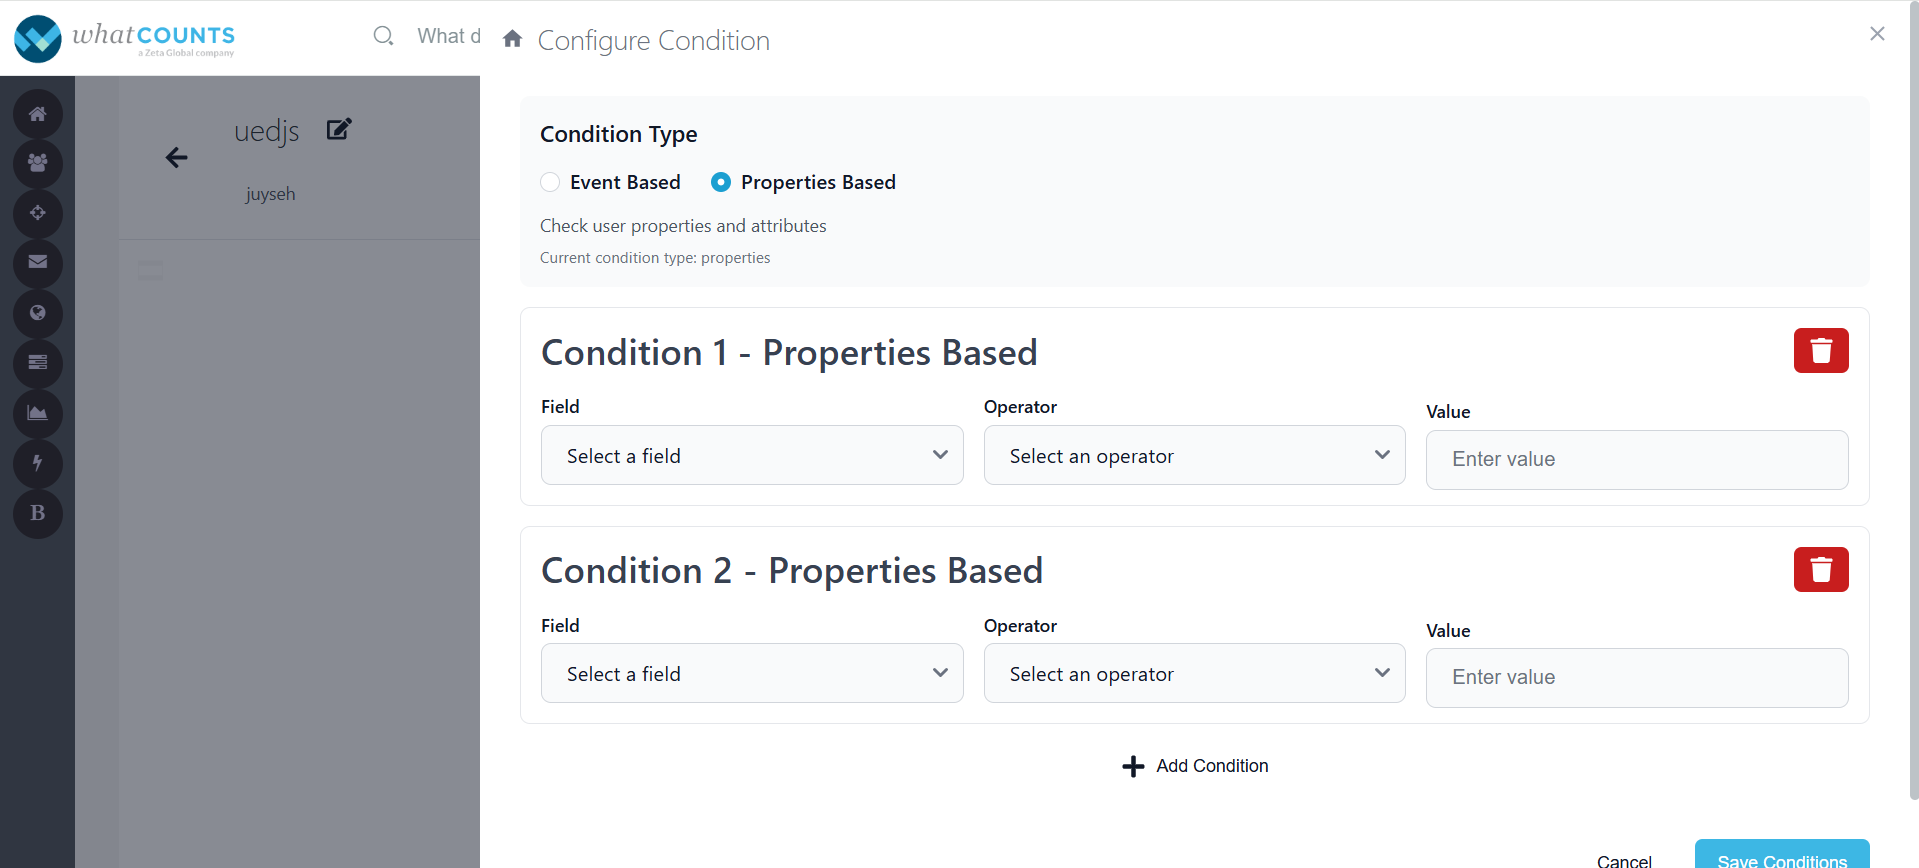
Condition 1, you can define a condition based on user properties and attributes.
-
Field – Choose the user properties like First Name, Last Name etc.
Operator – This allows you to select an operator which is used to compare the field with the value. Eg: Equals, Contains etc. -
Value – This allows you to enter an alpha-numeric value.
-
To add more than one condition, click on “+Add Condition” option.
-
-
Configure End Node
-
Select this node, when your automation flow is completed.
-
-
Click on “Save and Continue” to save your automation in draft mode.
-
Click on “Save and Activate” to save your automation and activate it.
-
Click on “Save and Deactivate” to save your automation and deactivate it.
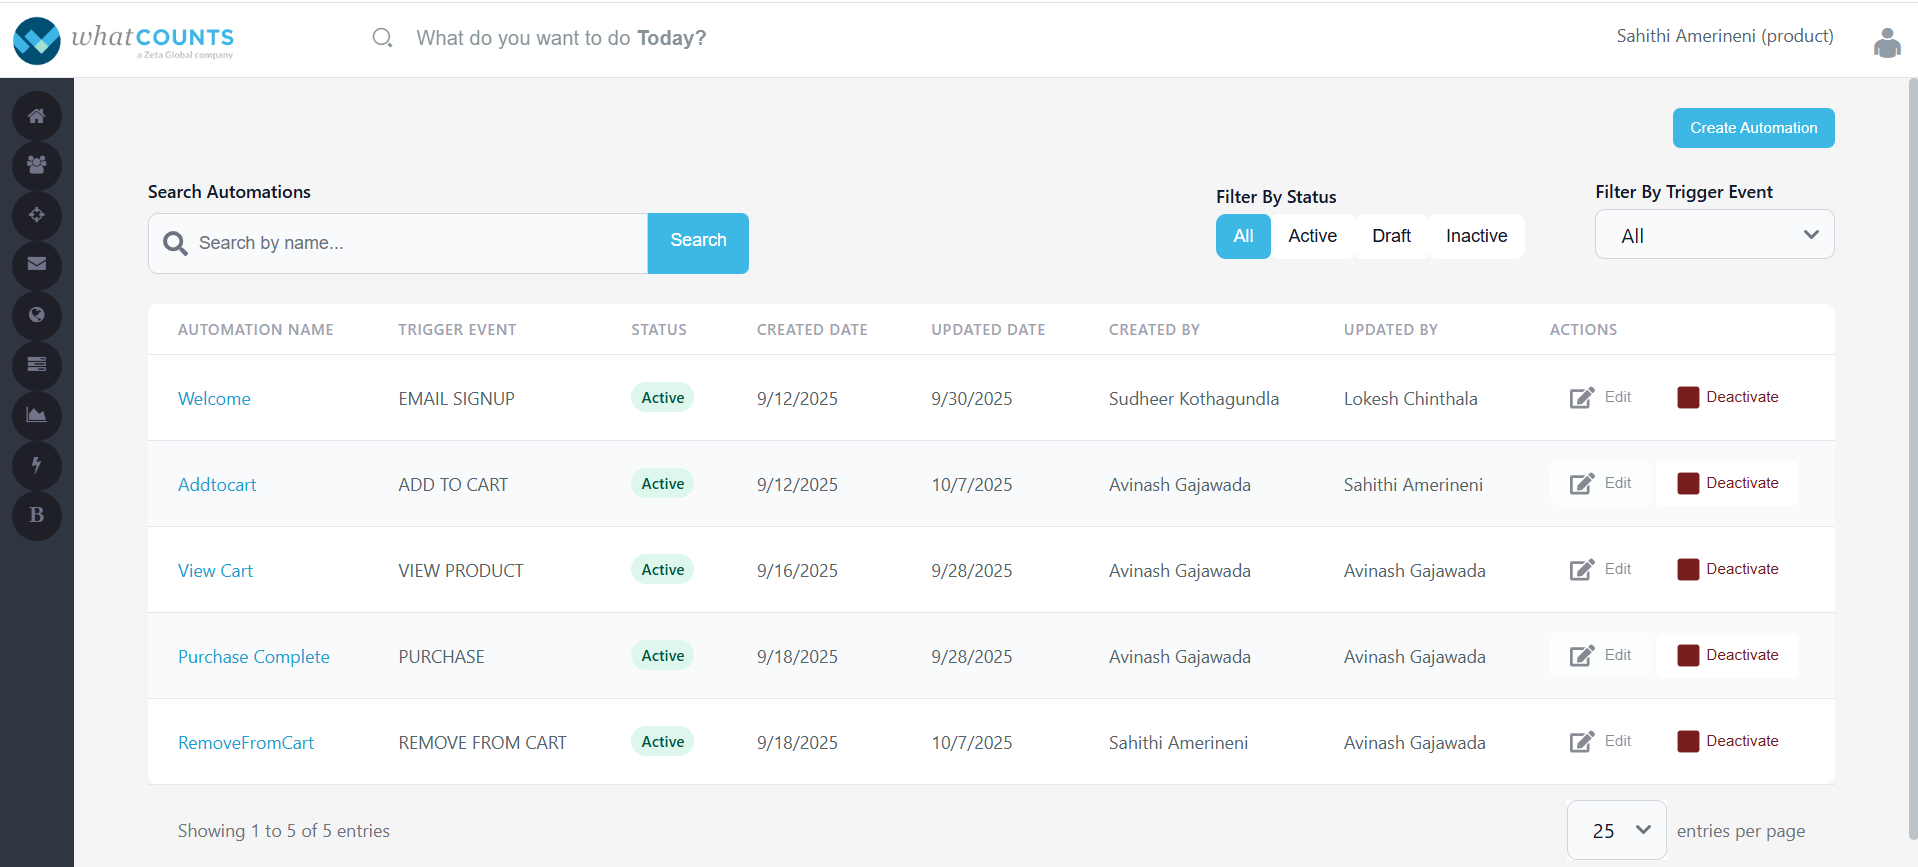
1.3 Dashboard
-
This allows you to view and manage all the automations which were created.
-
Below are the columns which are available:
-
Automation Name – It displays the name which you have given for your automation.
-
Trigger Event – It displays the type of event selected in your trigger node.
-
Status – It displays whether the automation is in Active state or Inactive state or Draft state.
-
Created Date – It displays the automation creation date.
-
Updated Date – It displays the last updated date, if any changes have been made to the automation.
-
Created By – It displays the name of user, who created the automation.
-
Updated By – It displays the name of user, who updated the automation recently/lastly.
-
Action: You can perform below two actions:
-
Edit – To perform any changes to your automation, you have to deactivate it and edit it. This will be in freezed mode and will be enabled only when you deactivate the automation.
-
Activate/Deactivate – Click on it to activate or deactivate an automation.
-
-
-
A search bar is available where you can enter one or more automation names, separated by commas, to quickly find specific automations.
-
You can filter the dashboard based on below columns:
-
Status [All/Active/In-active/Draft]
-
Trigger Event
-
2. Reports
-
It allows you to monitor and analyze the performance of automation campaigns.
It is divided into two main sections — the Dashboard and the Summary Report — providing both an overview and detailed insights into automation performance.
2.1. Dashboard
-
It provides a quick overview of all existing automation campaigns.
-
Each automation is listed with key information, including:
-
Automation ID – A unique identifier for automation.
-
Automation Name – The name of the automation configured during creation.
-
Trigger Event – The event that initiates the automation (e.g., email_signup, add_to_cart, etc).
-
Status – Displays whether the automation is currently Active, Inactive, or draft.
-
Nodes Count – Indicates the total number of nodes configured in the automation.
-
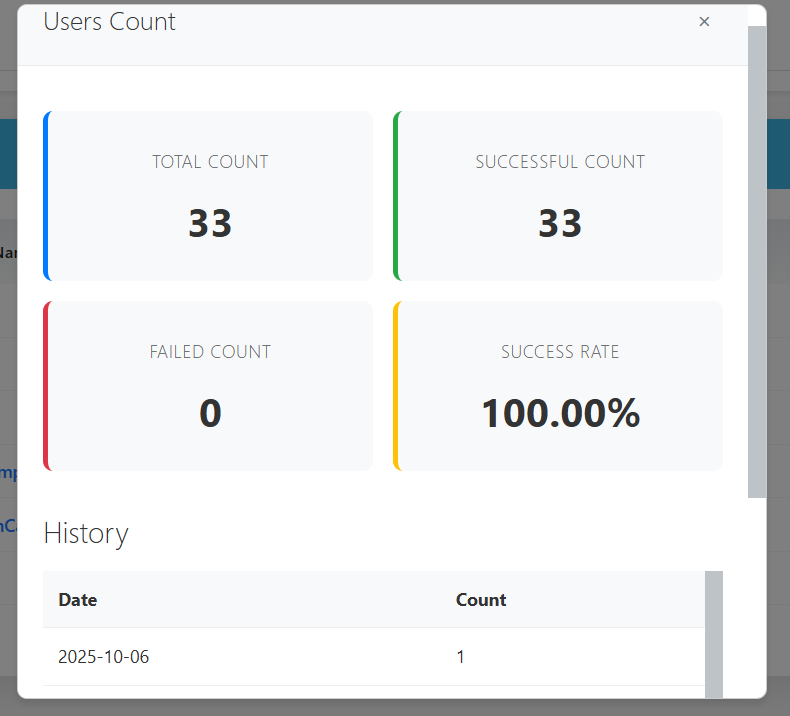
Users Count – Shows the number of users entered into the automation.
-
Click to view the details of the total number of users who were processed through the automation.
-
Total Count – The total number of users who entered the automation.
-
Successful Count – The number of users who were successfully processed without any errors.
-
Failed Count – The number of users that failed during processing.
-
Success Rate – The percentage of users successfully processed.
-
-
A History section is also provided below, which displays the date-wise breakdown of user counts processed through the automation, in descending order.
-
-
-
A Refresh button is available at the top-right corner to reload and fetch the latest automation data.
2.2. Summary Report
-
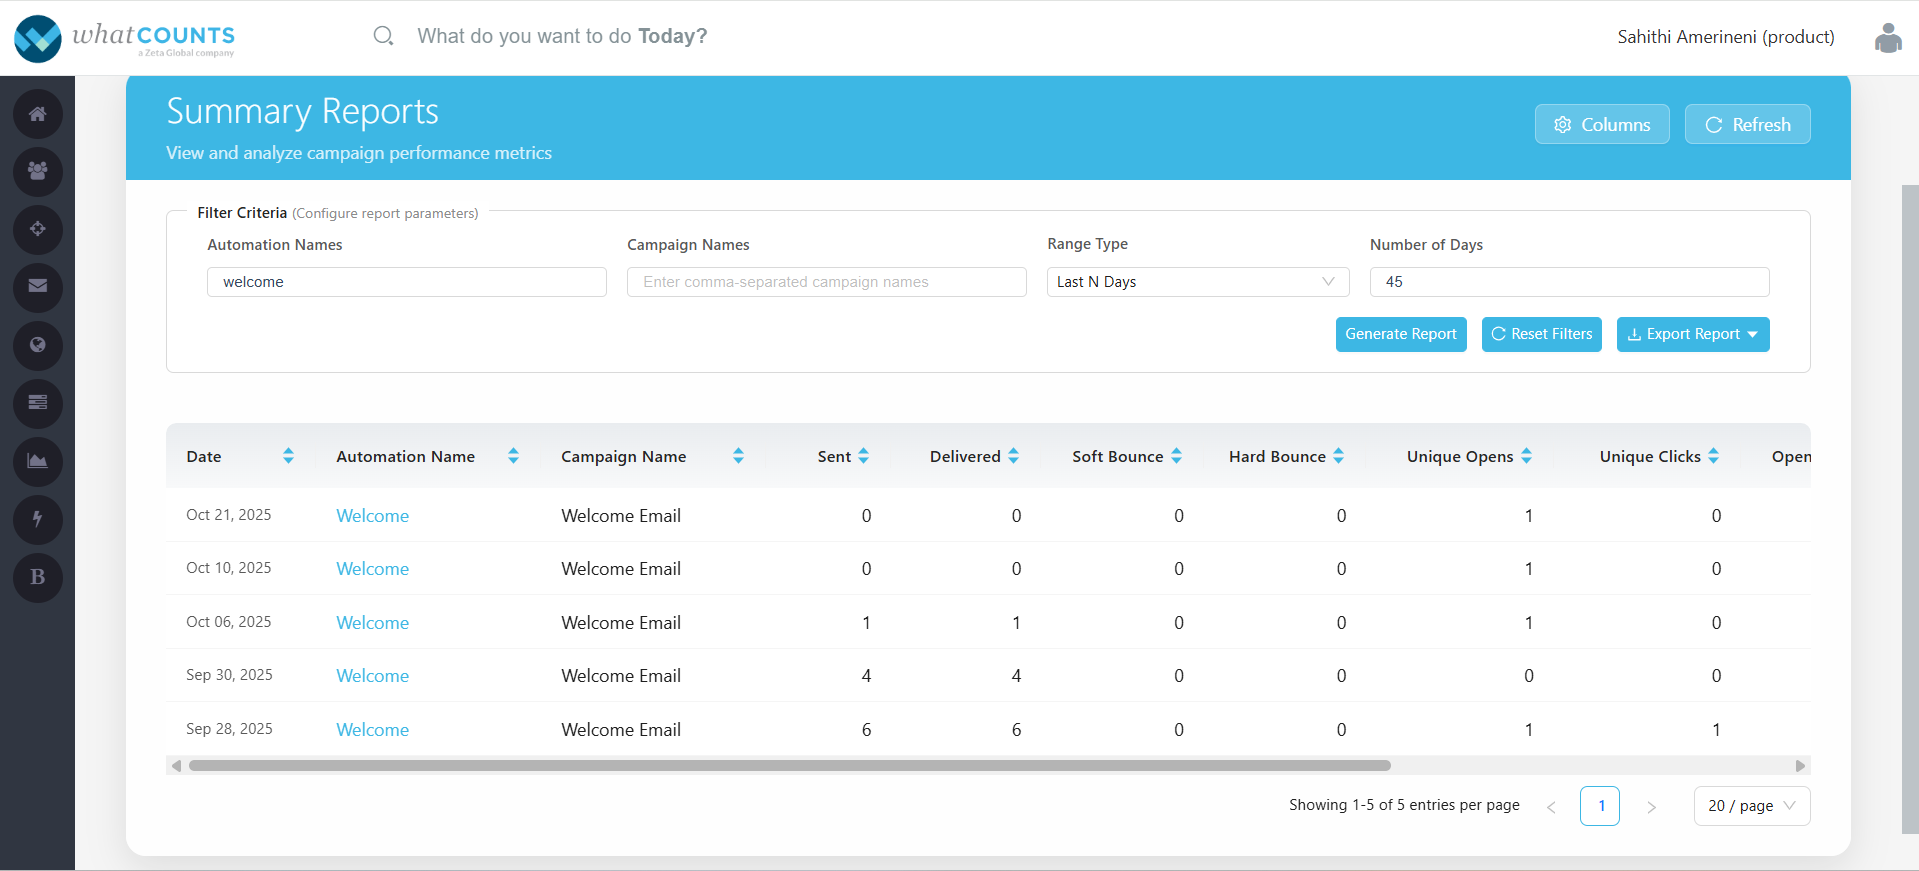
This section enables you to generate detailed reports for one or more automations to review campaign-level performance metrics.
-
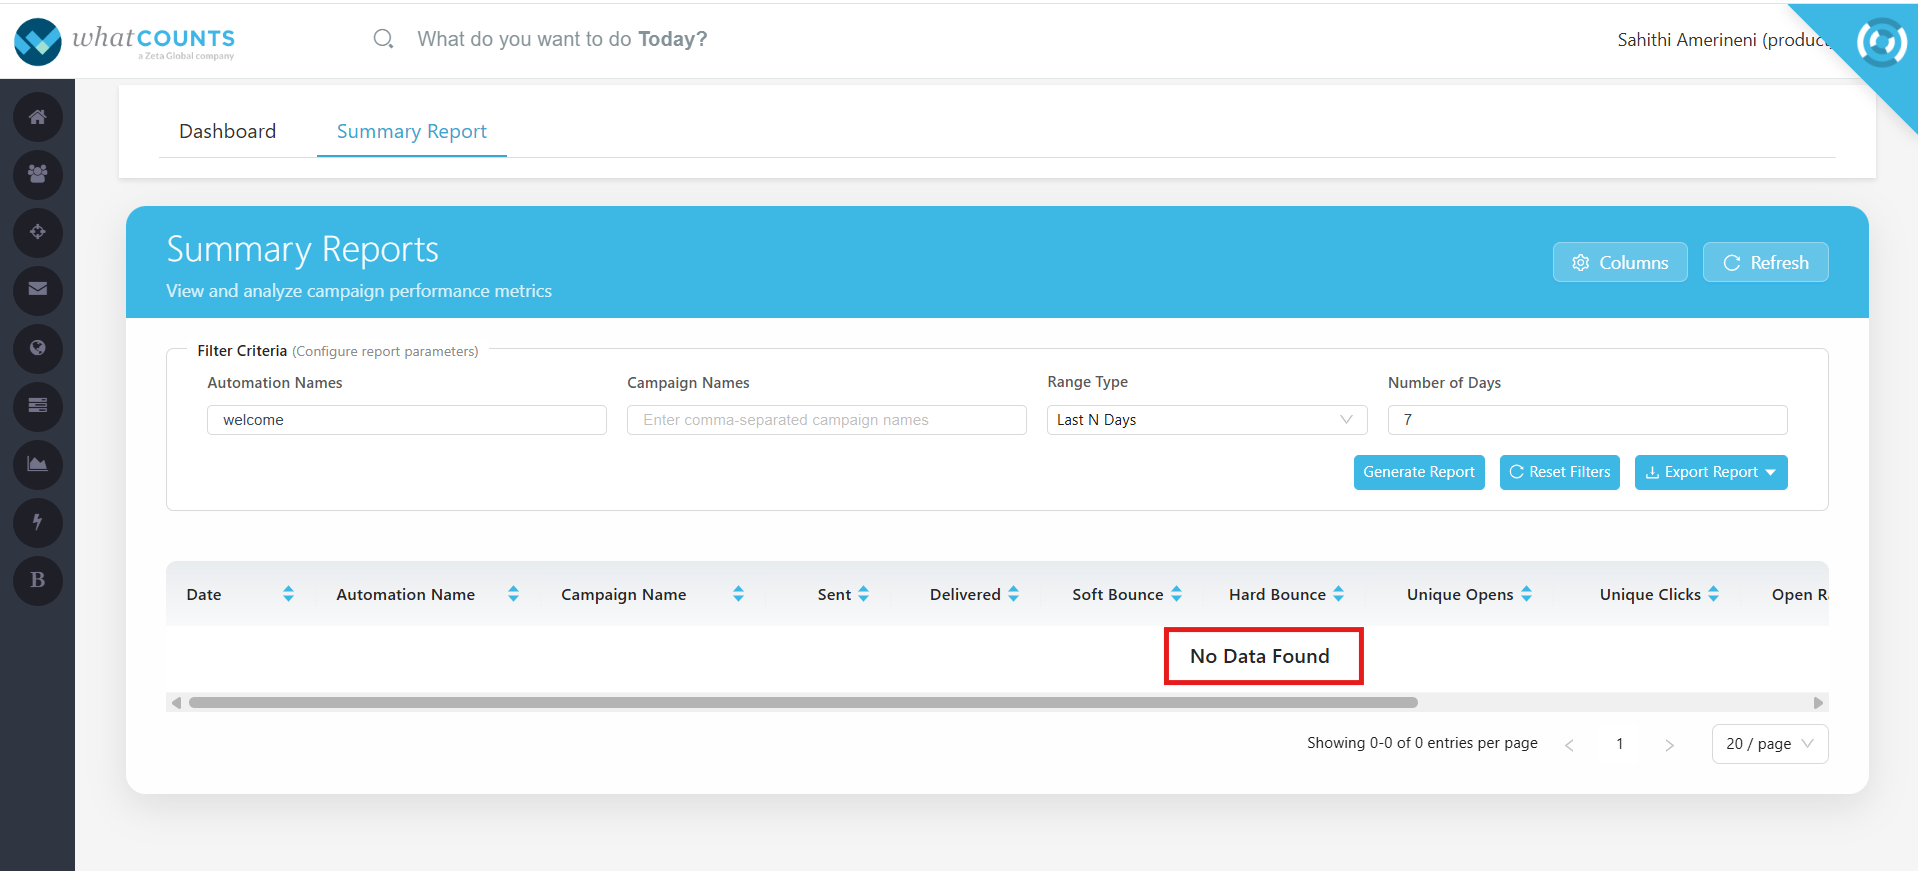
Filter Criteria
-
You can fetch the report by choosing from the following filters:
-
Automation Names – Enter one or more automation names separated by commas to fetch specific automations details in the report.
-
Campaign Names – Enter one or more campaign names separated by commas to view metrics for selected campaigns.
-
Range Type – Choose the date range type for your report (e.g., Last N Days or Date Range).
-
-
By default, the report will be generated and displayed for the date range of last N days with Number of Days as ‘7’.
-
If no records are found for the selected filters, a “No Data Found” message will be displayed.
-
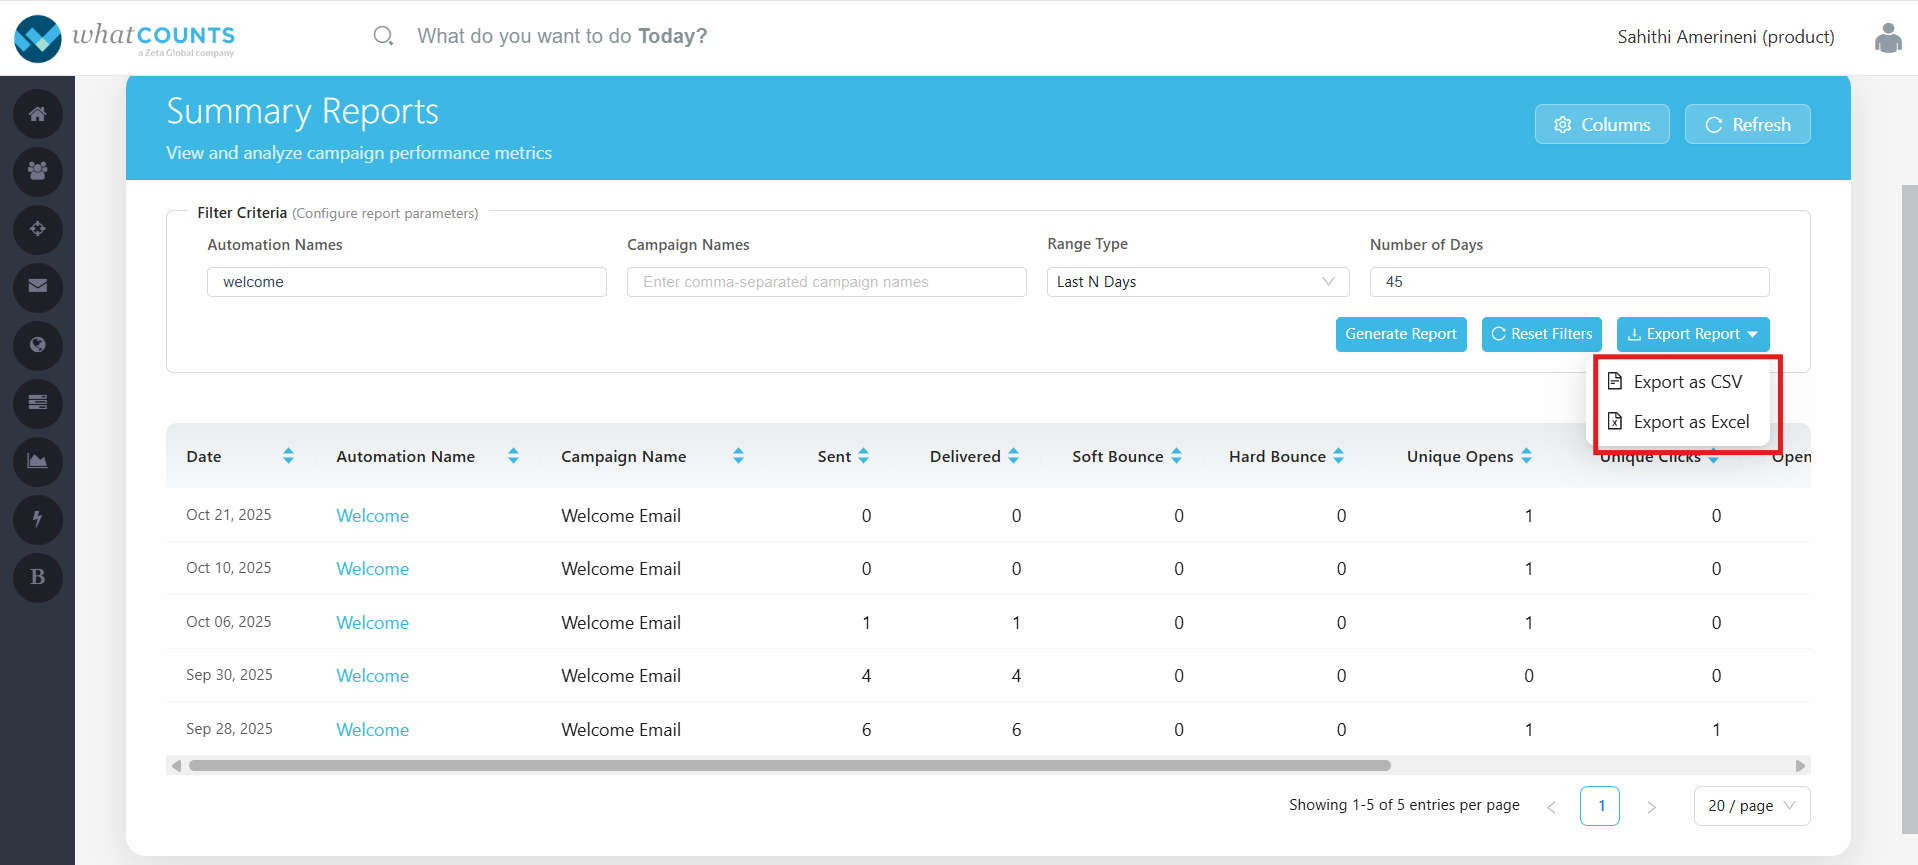
Click on “Generate Report” to generate the report.
-
Click on “Reset Filters” button to clear your selections.
-
Click “Export Report” to download the results in a preferred format, i.e., CSV or Excel.
-
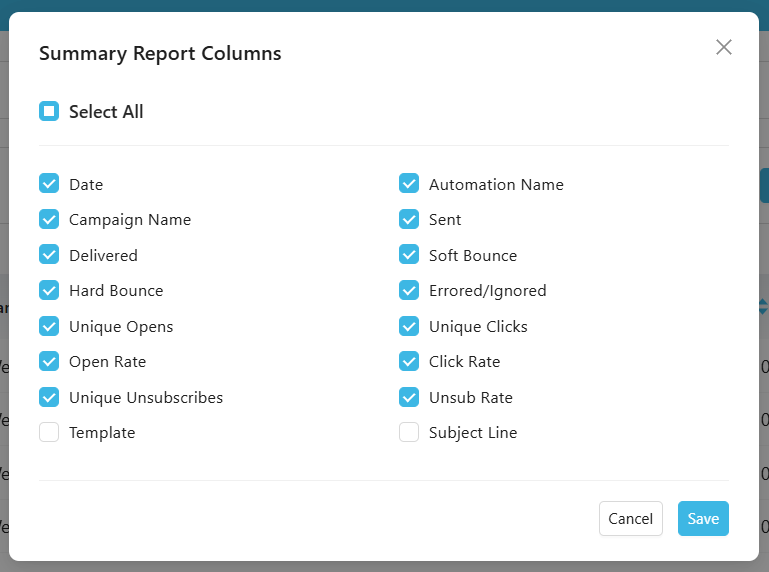
Click on the “Columns” button to select the columns which need to be visible in the report.
-
Template and Subject Line are optional columns, and all the other columns that are selected are default columns.
-
Click on the “Refresh” button to refresh the report metrics.
Report Metrics
-
Once generated, the report displays detailed metrics such as:
-
Date – The campaign send date.
-
Automation Name – The automation to which the campaign belongs.
-
Campaign Name – The name of the individual campaign.
-
Sent – Total number of emails sent.
-
Delivered – Number of emails successfully delivered.
-
Soft Bounce – Count of temporarily undeliverable emails.
-
Hard Bounce – Count of permanently undeliverable emails.
-
Unique Opens – Number of unique recipients who opened the email.
-
Unique Clicks – Number of unique recipients who clicked the email.
-
Open Rate – The percentage of recipients who opened the email.
-
Unsubscribes – Number of recipients who have unsubscribed.
-
3. Product Layouts
-
This module allows you to create a layout where you can add tags for products, which can be used and expanded within the main template.
-
This can be used in any number of templates.
-
Any changes made to product layout will be reflected in all the templates that use it.
Note: This module will not be available if only campaigns events is enabled for your realm.
3.1 Create Product Layout
-
To create a product layout, click on “Add New Product Layout”.
-
Below pop-up will appear where you can add a unique name for your product layout and a short description of the layout purpose or usage for it.

Once you click on Save, the following screen appears:
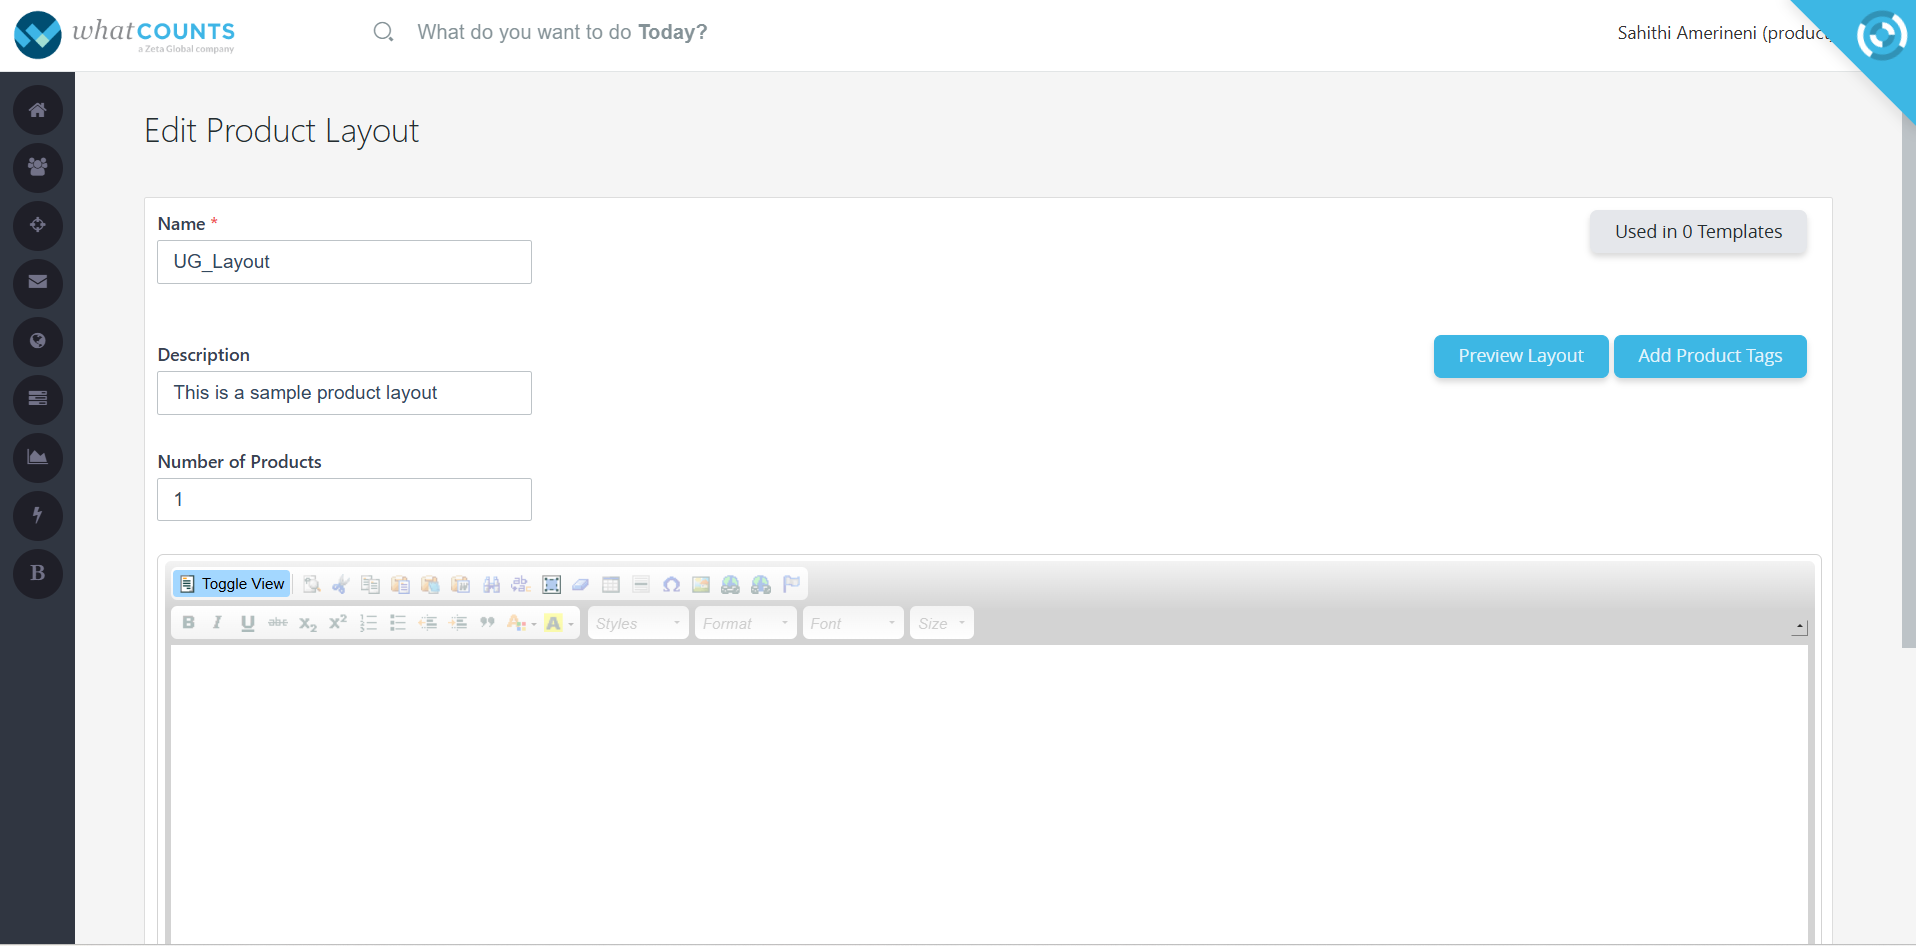
Fields:
-
Name — A mandatory field that displays the name you have entered in the previous step.
-
Description — It displays a short description of the layout’s purpose or usage which you have entered in the previous step.
-
Number of Products — Specify the number of products to be displayed in this layout.
-
Editor Section — Use the content editor below to design your product layout using available formatting tools.
-
Preview Layout — Click this button to preview your design before saving.
-
Add Product Tags — Use this option to insert available product tags into your layout.
-
Used in Templates — Displays the number of templates currently using this product layout. On clicking on it, will display the list of templates it is associated. You can even get redirected to the templates module by clicking on “Go to Templates”.
3.1.1 Adding Product Tags
-
Click “Add Product Tags” on the Product Layout editor screen.
-
This opens a popup window displaying all available product-layouts in the realm.
-
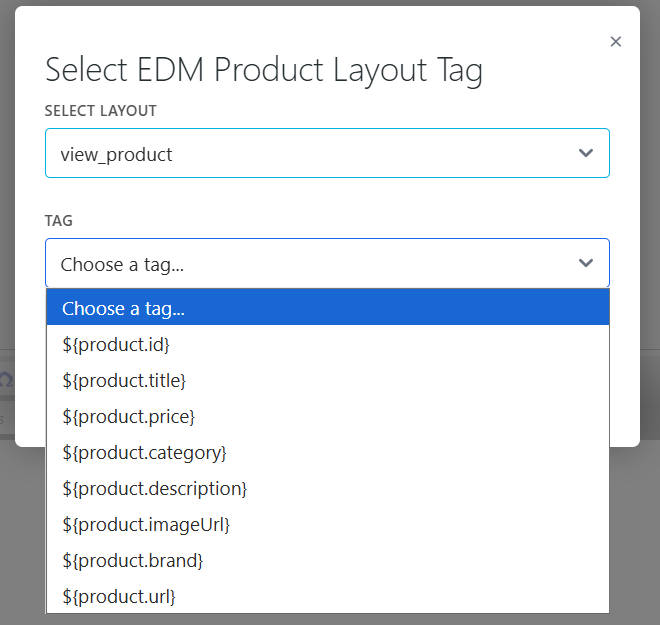
Once you select the product layout, you will be able to see the list of tags available or configured for that layout in the realm settings.
-
Select the Required Tags
Choose from the list of available tags — these are based on the event properties configured for your realm.
Examples of product tags include:-
{product_name}
-
{product_price}
-
{product_image}
-
{product_description}
-
-
Insert Tags into the Editor
Once you select the tags, they will be automatically inserted into your editor at the cursor’s position.
You can format or arrange them as needed to match your layout design. -
Preview Your Layout
After adding the tags, click Preview Layout to visualize how your layout will look once the tags are populated with real product data.
Tag Format
-
Tags follow the {tagname} format.
-
Each tag is expanded independently during rendering and then inserted into the main template.
-
Only event-specific properties available for your realm can be used as tags in product layouts.
-
When inserted into the main template using %%edm_prod_layout%%, each tag will automatically expand to show the corresponding product details.
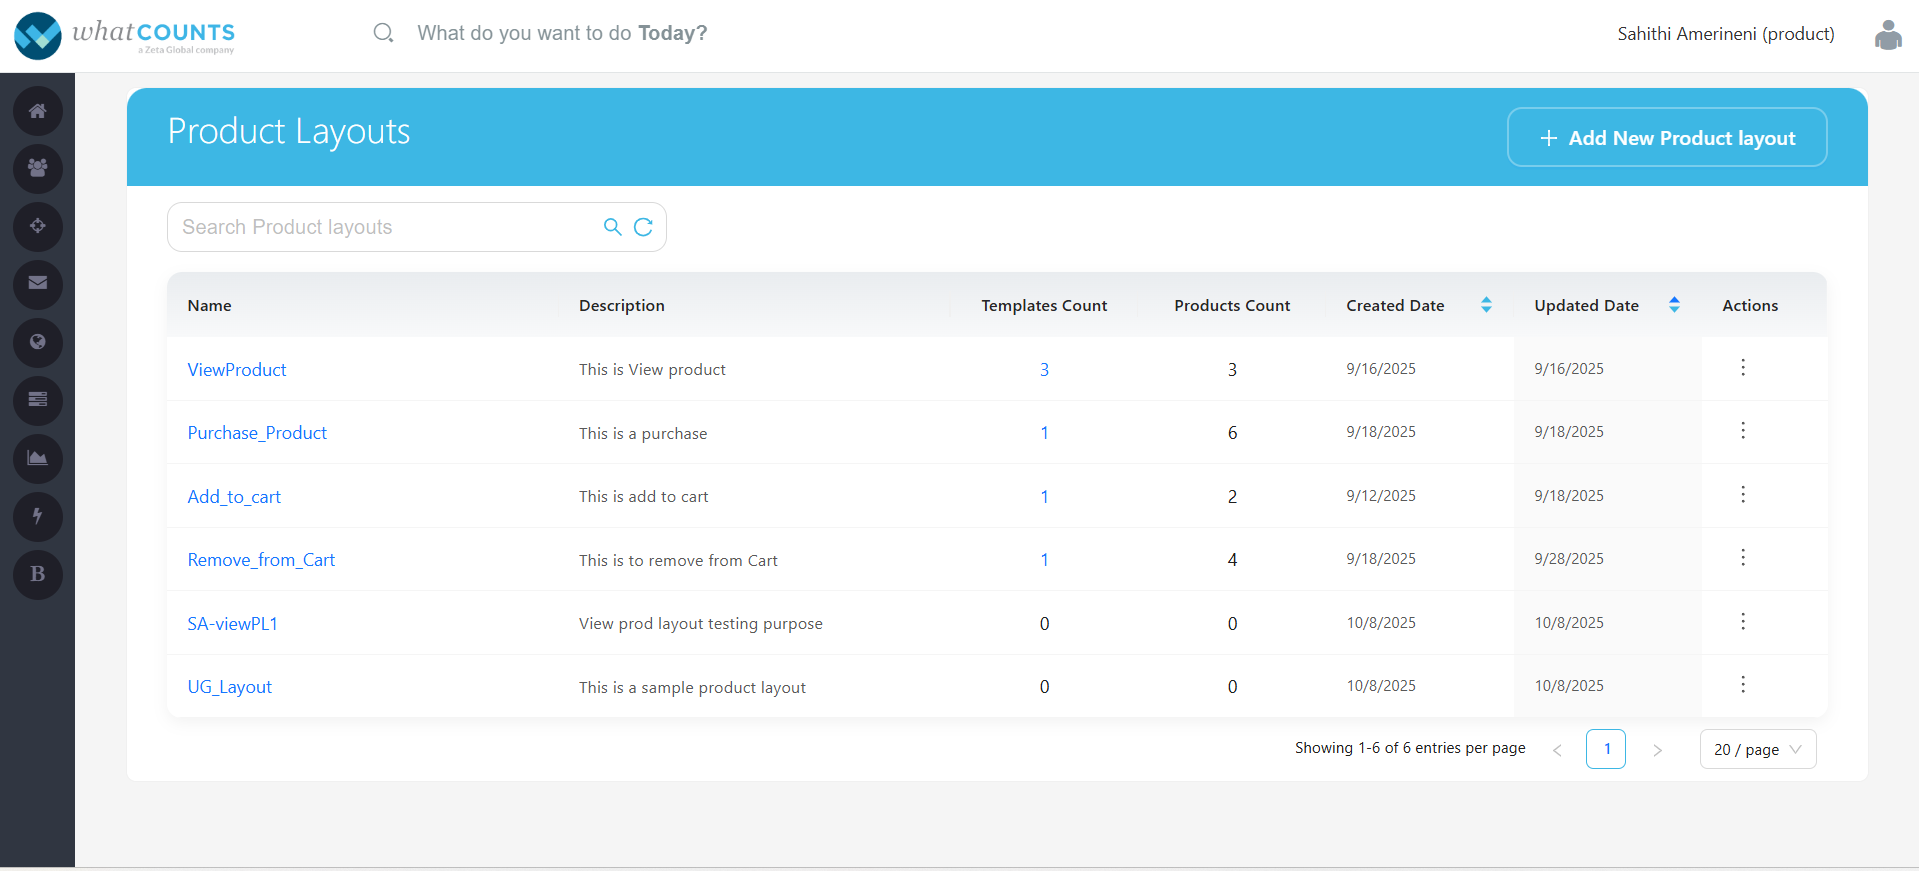
3.2 Dashboard
-
Once product layouts are created, you can easily manage them through the Product Layout Dashboard. The dashboard provides an overview of all existing layouts and the templates in which they are used.
-
Name – This displays the name of the product layout.
-
Description – This displays the description given to the product layout.
-
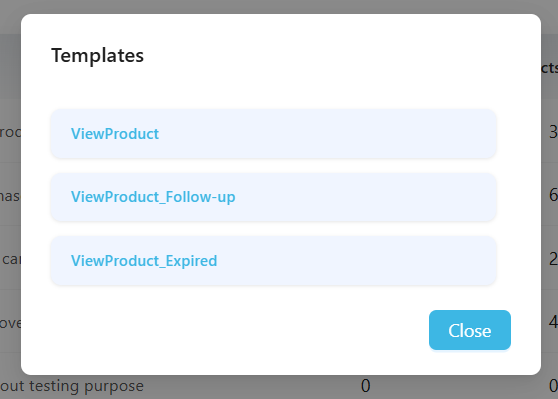
Templates Count – This displays the count of the templates in which the product layout is associated in. On clicking on the count will display the template names.
-
Products Count – This displays the count of the products.
-
Created Date – This displays the date when the product layout is created.
-
Updated Date – This displays the last updated date when any changes were made to the layout.
-
Actions – Below are few actions which can be performed:
-
Each product layout in the dashboard includes the following options:
-
Preview Layout
-
Click Preview Layout to view how the layout will appear when rendered with product data.
-
This allows you to verify design elements, formatting, and tag placements before using the layout in a live template.
-
-
Copy Layout
-
Select Copy Layout to create a duplicate of an existing product layout.
-
This is useful when you want to use an existing design as a base and make small modifications without affecting the original layout.
-
The copied layout can be renamed and edited independently.
-
-
Edit Layout
-
Click Edit Layout to modify the existing product layout.
-
You can update the name, description, number of products, or tags as needed.
-
-
Note: Any changes made to a product layout will automatically reflect in all templates where the layout is used.
-
Delete Layout
-
To remove a product layout permanently, click Delete Layout.
-
A confirmation message will appear to prevent accidental deletion.
-
Deleting a layout will also remove its reference from any templates that were using it.
-
-
You can search a product layout by entering its name in the search bar.